No edit summary Tag: rte-source |
No edit summary |
||
| (33 intermediate revisions by 23 users not shown) | |||
| Line 6: | Line 6: | ||
|Flag = Five |
|Flag = Five |
||
|Grave = Five (at the start) |
|Grave = Five (at the start) |
||
| ⚫ | |||
| − | |Diff = Easy-medium |
||
| ⚫ | |||
|FR = A [[trophy]] |
|FR = A [[trophy]] |
||
|NR = A [[money bag]] |
|NR = A [[money bag]] |
||
|before = Survival: Day |
|before = Survival: Day |
||
|after = Survival: Pool}} |
|after = Survival: Pool}} |
||
| − | {{ |
+ | {{Pic|SurvivalNight}} |
| − | '''Survival: Night''' is the second [[:Category:Plants vs. Zombies levels|level]] of [[Survival Mode]] introduced in ''[[Plants vs. Zombies]]'', ''[[Plants vs. Zombies: Journey to the West]]'', and ''[[Plants vs. Zombies: Great Wall Edition]]''. |
+ | '''Survival: Night''' is the second [[:Category:Plants vs. Zombies levels|level]] of [[Survival Mode]] introduced in ''[[Plants vs. Zombies]]'', ''[[Plants vs. Zombies: Journey to the West]]'', and ''[[Plants vs. Zombies: Great Wall Edition]]''. Being set in [[Night]], the objective of this game is to survive five waves of [[Zombies (PvZ)|zombies]] with one flag given for each wave. |
==Difficulty== |
==Difficulty== |
||
| − | *Regarding zombies, this level is not very different from the first Survival level. In fact, |
+ | *Regarding zombies, this level is not very different from the first Survival level. The zombies are the same, so the same strategies should be used. In fact, it is only harder because of its nighttime setting. |
| − | *[[Sun-shroom]]s are the ideal sun-producing plant for this level. The player can replace them with [[Sunflower]]s and [[Twin Sunflower]]s later on, but |
+ | *[[Sun-shroom]]s are the ideal sun-producing plant for this level. The player can replace them with [[Sunflower]]s and [[Twin Sunflower]]s later on, but this will be extremely tedious and unnecessary. |
| − | *The player |
+ | *The player does not need to stray far from [[:Category:Mushrooms|mushrooms]] to complete this level. All [[:Category:Night obtained plants|night obtained plants]] along with [[Magnet-shroom]] and [[Gloom-shroom]] are perfect for advancing further. |
| − | *To avoid |
+ | *To avoid [[crater]]s on the lawn, the player can replace [[Doom-shroom]] and opt with something less powerful, like [[Cherry Bomb]]. |
| + | *During a huge wave, a new [[Grave (PvZ)|grave]] will automatically spawn, thus the players should always bring a [[Grave Buster]] with them ([[Imitater]] Grave Buster too, if the player desires) even if they had already destroyed the previous ones. The player should not forget about the fact that the graves will destroy any plants that are on its tile too. |
||
| + | *[[Cob Cannon]]s are undesirable in this level, as the nighttime setting and its high sun cost will slow the speed that the player can build its defense, allowing the zombies to pass through if they are too focused on bringing them out. |
||
==Icons== |
==Icons== |
||
| Line 34: | Line 35: | ||
====After first flag==== |
====After first flag==== |
||
| − | Then, plant two [[Gloom-shroom]]s and two [[Garlic]] (two if Pole Vaulting |
+ | Then, plant two [[Gloom-shroom]]s and two [[Garlic]] (two if [[Pole Vaulting Zombie]]s appear) in the second and fourth lanes. Plant some defensive plants the other three lanes. You can plant [[Tall-nut]]s, [[Spikeweed]]s, and [[Spikerock]]s to increase your defense. [[Pumpkin]]s and [[Magnet-shroom]]s are unneeded. |
It should look like this when you're done: |
It should look like this when you're done: |
||
| Line 45: | Line 46: | ||
===Jackninja5's Strategy=== |
===Jackninja5's Strategy=== |
||
| − | + | ====First step==== |
|
| − | Have you ever learned that Scaredy-shrooms are useful? I have |
+ | Have you ever learned that Scaredy-shrooms are useful? I have. Want a bet? Do this Survival Mode level. If you have ten slots, you are using every nocturnal plant which is not aquatic. Plant: |
| − | *Puff-shroom |
+ | *[[Puff-shroom]] |
| − | *Sun-shroom |
+ | *[[Sun-shroom]] |
| − | *Fume-shroom |
+ | *[[Fume-shroom]] |
| − | *Grave Buster |
+ | *[[Grave Buster]] |
| − | *Scaredy-shroom |
+ | *[[Scaredy-shroom]] |
| − | *Magnet-shroom (optional; probably should have it) |
+ | *[[Magnet-shroom]] (optional; probably should have it) |
| − | *Hypno-shroom (optional) |
+ | *[[Hypno-shroom]] (optional) |
| − | *Ice-shroom (optional) |
+ | *[[Ice-shroom]] (optional) |
| − | *Doom-shroom (optional) |
+ | *[[Doom-shroom]] (optional) |
| − | *Gloom-shroom (optional) |
+ | *[[Gloom-shroom]] (optional) |
| − | Don't use any Gold |
+ | Don't use any [[Gold Magnet]]s. Focus on Sun-shrooms (two columns) and Puff-shrooms first. Plant Scaredy-shrooms in the third column for [[Conehead Zombie]]s. Use Grave Busters and replace Puff-shrooms with Fume-shrooms. Here are three planting diagrams: |
This diagram (first time): |
This diagram (first time): |
||
| − | S S SC PS PS PS<br> |
+ | S S SC PS PS PS<br /> |
| − | S S SC PS PS PS<br> |
+ | S S SC PS PS PS<br /> |
| − | S S SC PS PS PS<br> |
+ | S S SC PS PS PS<br /> |
| − | S S SC PS PS PS<br> |
+ | S S SC PS PS PS<br /> |
S S SC PS PS PS |
S S SC PS PS PS |
||
Second diagram: |
Second diagram: |
||
| − | S S SC FS PS PS<br> |
+ | S S SC FS PS PS<br /> |
| − | S S SC FS PS PS<br> |
+ | S S SC FS PS PS<br /> |
| − | S S SC FS PS PS<br> |
+ | S S SC FS PS PS<br /> |
| − | S S SC FS PS PS<br> |
+ | S S SC FS PS PS<br /> |
S S SC FS PS PS |
S S SC FS PS PS |
||
Third diagram (do this in the second flag if not completed): |
Third diagram (do this in the second flag if not completed): |
||
| − | S S SS FS PS FS<br> |
+ | S S SS FS PS FS<br /> |
| − | S S SS FS PS FS<br> |
+ | S S SS FS PS FS<br /> |
| − | >S S SS FS PS FS<br> |
+ | >S S SS FS PS FS<br /> |
| − | S S SS FS PS FS<br> |
+ | S S SS FS PS FS<br /> |
>S S SS FS PS FS |
>S S SS FS PS FS |
||
| Line 90: | Line 91: | ||
Don't replace the Puff-shrooms with Fume-shrooms in the fifth column. |
Don't replace the Puff-shrooms with Fume-shrooms in the fifth column. |
||
| − | + | ====Step 2==== |
|
Create the third diagram above. But choose these: |
Create the third diagram above. But choose these: |
||
*Fume-shroom |
*Fume-shroom |
||
| − | *Imitater Fume-shroom (don’t have an |
+ | *[[Imitater]] Fume-shroom (don’t have an Imitater? Use a [[Jalapeno]]) |
*Magnet-shroom |
*Magnet-shroom |
||
*Grave Buster |
*Grave Buster |
||
*Gloom-shroom |
*Gloom-shroom |
||
| − | *Pumpkin (optional) |
+ | *[[Pumpkin]] (optional) |
| − | *Squash (optional) |
+ | *[[Squash]] (optional) |
*Hypno-shroom (optional) |
*Hypno-shroom (optional) |
||
*Ice-shroom (optional) |
*Ice-shroom (optional) |
||
*Doom-shroom (optional) |
*Doom-shroom (optional) |
||
| ⚫ | After the third diagram, you will now know about the fifth column. Replace the Puff-shrooms with Magnet-shrooms, kill Football |
||
| ⚫ | After the third diagram, you will now know about the fifth column. Replace the Puff-shrooms with Magnet-shrooms, kill [[Football Zombie]]s, and upgrade the front Fume-shrooms to Gloom-shrooms but '''not''' the Fume-shrooms in the fourth column. Just do this and use the optional plants if needed. The diagram should look like this: |
||
| ⚫ | |||
| + | |||
| ⚫ | |||
| − | S S SC FS MS |
+ | S S SC FS MS FS<br /> |
| − | S S SC FS MS GS<br> |
+ | S S SC FS MS GS<br /> |
| ⚫ | |||
| ⚫ | |||
S S SC FS MS FS |
S S SC FS MS FS |
||
| Line 115: | Line 117: | ||
*GS = Gloom-shroom |
*GS = Gloom-shroom |
||
| − | + | ====Step 3==== |
|
Plant: |
Plant: |
||
| Line 122: | Line 124: | ||
*Grave Buster |
*Grave Buster |
||
*Anything else besides Gold Magnets |
*Anything else besides Gold Magnets |
||
| + | |||
The last two Fume-shrooms at the front should be replaced by Gloom-shrooms. |
The last two Fume-shrooms at the front should be replaced by Gloom-shrooms. |
||
| − | + | ====Step 4==== |
|
Plant these: |
Plant these: |
||
| Line 133: | Line 136: | ||
*Gloom-shroom (in case) |
*Gloom-shroom (in case) |
||
*Anything but Gold Magnet |
*Anything but Gold Magnet |
||
| ⚫ | |||
| ⚫ | |||
| ⚫ | |||
| + | |||
| ⚫ | |||
[[File:Jackninja5SurvivalNight.png|thumb]] |
[[File:Jackninja5SurvivalNight.png|thumb]] |
||
Plants: |
Plants: |
||
| Line 142: | Line 146: | ||
*Pumpkin |
*Pumpkin |
||
*Anything but Gold Magnet |
*Anything but Gold Magnet |
||
| + | |||
| − | Put Pumpkins on Magnets due to the Pole Vaulting |
+ | Put Pumpkins on Magnets due to the [[Pole Vaulting Zombie]]s. |
===Tomtomdevil's Strategy=== |
===Tomtomdevil's Strategy=== |
||
| Line 158: | Line 163: | ||
*[[Jalapeno]] (if you have ten seed slots) |
*[[Jalapeno]] (if you have ten seed slots) |
||
| − | Quickly plant Sun-shrooms and Puff-shrooms ASAP. When you finish planting two columns of Sun-shrooms, use Grave Busters to destroy graves. Then plant three columns of Fume-shrooms. When there are Buckethead zombies, plant a column of Magnet-shrooms. After that plant a column of Wall-nuts or Tall-nuts. Use instant-kill plants whenever you are in trouble. |
+ | Quickly plant Sun-shrooms and Puff-shrooms ASAP. When you finish planting two columns of Sun-shrooms, use Grave Busters to destroy graves. Then plant three columns of Fume-shrooms. When there are Buckethead zombies, plant a column of Magnet-shrooms. After that, plant a column of Wall-nuts or Tall-nuts. Use instant-kill plants whenever you are in trouble. |
| − | ==Monopolypark's strategy== |
+ | ===Monopolypark's strategy=== |
Plants needed: |
Plants needed: |
||
*[[Sun-shroom]] |
*[[Sun-shroom]] |
||
| Line 171: | Line 176: | ||
*[[Grave Buster]] |
*[[Grave Buster]] |
||
*[[Starfruit]] |
*[[Starfruit]] |
||
| − | Note: Squash |
+ | Note: Squash, Potato Mine and Puff-shroom are needed in this process. |
| − | Plant |
+ | Plant Sun-shrooms as fast as you can in the three leftmost columns. In column five and six, plant Fume-shrooms that are guarded with Pumpkins. Eliminate the graves as fast as possible. In column five, plant Starfruits. |
| − | In flag two, plant |
+ | In flag two, plant Spikeweeds in the front most three columns. Also, replace all of the Sun-shrooms with Starfruits. |
==Gallery== |
==Gallery== |
||
<gallery bordercolor="transparent"> |
<gallery bordercolor="transparent"> |
||
Survival Night.JPG|By {{U|Someone456}} |
Survival Night.JPG|By {{U|Someone456}} |
||
| − | BUL9 standard Night layout.png|This strategy is compatible with Night levels in Adventure Mode and Survival: Night |
+ | BUL9 standard Night layout.png|This strategy is compatible with Night levels in Adventure Mode and Survival: Night |
2014-09-03 143023.png|{{U|Tekniknaldo1}}'s strategy |
2014-09-03 143023.png|{{U|Tekniknaldo1}}'s strategy |
||
7-Gloom, Magnetic and DISgusting Survival Night Strategy.jpg|{{U|AWikiBoy521}}'s old strategy |
7-Gloom, Magnetic and DISgusting Survival Night Strategy.jpg|{{U|AWikiBoy521}}'s old strategy |
||
| − | IMG 0773-1-.PNG| |
+ | IMG 0773-1-.PNG|{{U|Lily8763cp}}'s strategy |
Screen Shot 2015-05-16 at 2.07.17 pm.png|By {{U|TheZombieFighter}} |
Screen Shot 2015-05-16 at 2.07.17 pm.png|By {{U|TheZombieFighter}} |
||
| + | IMG_0237.PNG|By {{U|EpicGamer23468}} |
||
| + | SN 1.png|By MyNameIsMyName |
||
| + | SN 2.png|First flag |
||
| + | SN 3.png|Second flag |
||
| + | SN 4.png|Third flag |
||
| + | SN 5.png|Fourth flag |
||
| + | SN C.png|Completed by MyNameIsMyName |
||
| + | IMG_0336.PNG|Mushed Room (Get it?) by EpicGamer23468 |
||
</gallery> |
</gallery> |
||
| + | |||
| + | ==Walkthrough== |
||
| + | <gallery widths="250"> |
||
| + | Plants vs. Zombies - Survival - Night (Android Gameplay HD) Ep.55|By {{U|Alex5432000}} |
||
| + | Plants vs. Zombies (PC) - Survival Night Gameplay Playthrough |
||
| + | </gallery> |
||
| + | |||
{{Survival}} |
{{Survival}} |
||
| + | <poll> |
||
| + | How would you rate Survival: Night's difficulty? |
||
| + | Very hard |
||
| + | Hard |
||
| + | Somewhat hard |
||
| + | Medium |
||
| + | Somewhat easy |
||
| + | Easy |
||
| + | Very easy |
||
| + | </poll> |
||
[[Category:Normal Survival]] |
[[Category:Normal Survival]] |
||
[[Category:Plants vs. Zombies: Journey to the West]] |
[[Category:Plants vs. Zombies: Journey to the West]] |
||
Revision as of 23:33, 27 July 2019
Survival: Night is the second level of Survival Mode introduced in Plants vs. Zombies, Plants vs. Zombies: Journey to the West, and Plants vs. Zombies: Great Wall Edition. Being set in Night, the objective of this game is to survive five waves of zombies with one flag given for each wave.
Difficulty
- Regarding zombies, this level is not very different from the first Survival level. The zombies are the same, so the same strategies should be used. In fact, it is only harder because of its nighttime setting.
- Sun-shrooms are the ideal sun-producing plant for this level. The player can replace them with Sunflowers and Twin Sunflowers later on, but this will be extremely tedious and unnecessary.
- The player does not need to stray far from mushrooms to complete this level. All night obtained plants along with Magnet-shroom and Gloom-shroom are perfect for advancing further.
- To avoid craters on the lawn, the player can replace Doom-shroom and opt with something less powerful, like Cherry Bomb.
- During a huge wave, a new grave will automatically spawn, thus the players should always bring a Grave Buster with them (Imitater Grave Buster too, if the player desires) even if they had already destroyed the previous ones. The player should not forget about the fact that the graves will destroy any plants that are on its tile too.
- Cob Cannons are undesirable in this level, as the nighttime setting and its high sun cost will slow the speed that the player can build its defense, allowing the zombies to pass through if they are too focused on bringing them out.
Icons
")
")
")
Strategies
Strategy by Someone456
First flag
Plant many Sunflowers and Puff-shrooms as soon as possible and use the Grave Buster to remove graves
After first flag
Then, plant two Gloom-shrooms and two Garlic (two if Pole Vaulting Zombies appear) in the second and fourth lanes. Plant some defensive plants the other three lanes. You can plant Tall-nuts, Spikeweeds, and Spikerocks to increase your defense. Pumpkins and Magnet-shrooms are unneeded.
It should look like this when you're done:
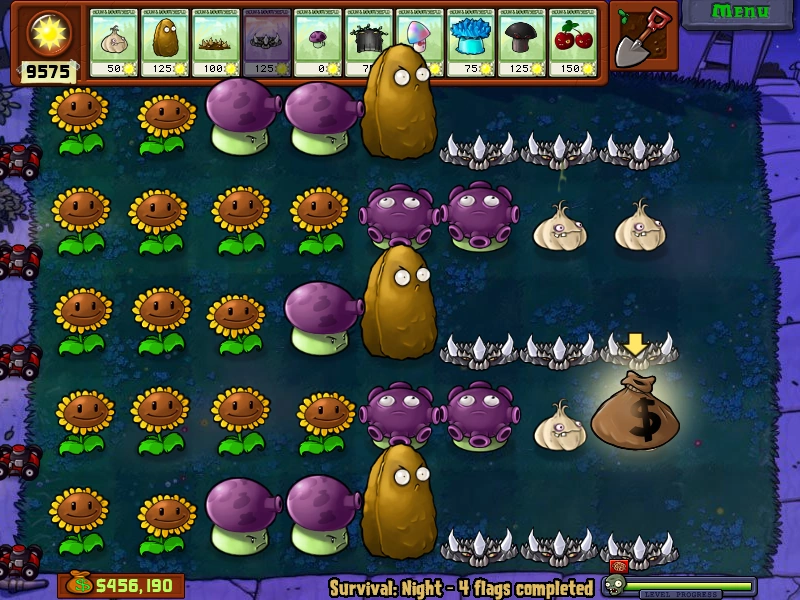
Note: The money bag is on top of a Garlic.
Remember to bring the Grave Buster to remove graves. You will start with five graves. An extra grave will always pop out on one patch on the lawn. They pop out whenever a huge wave starts, so ambush zombies will always appear. If the lawn is full of plants, one plant will be removed and the grave will still pop out.
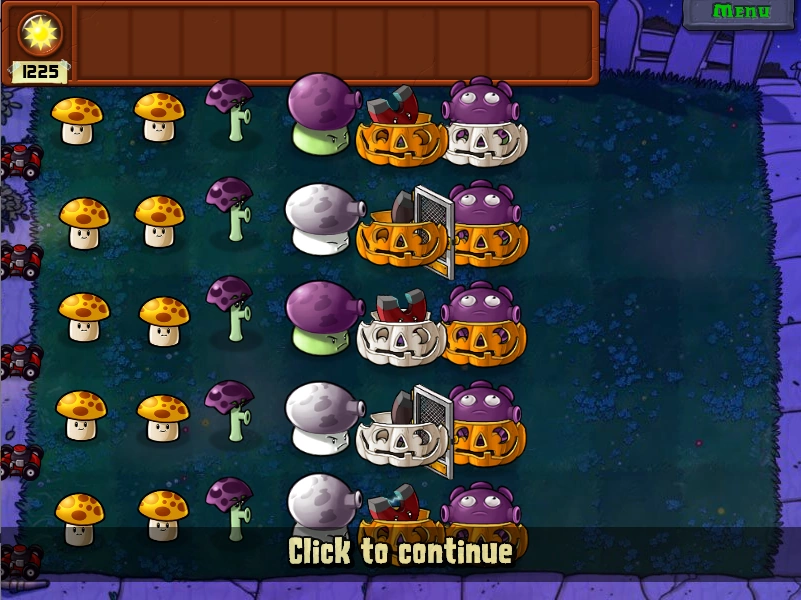
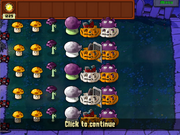
Jackninja5's Strategy
First step
Have you ever learned that Scaredy-shrooms are useful? I have. Want a bet? Do this Survival Mode level. If you have ten slots, you are using every nocturnal plant which is not aquatic. Plant:
- Puff-shroom
- Sun-shroom
- Fume-shroom
- Grave Buster
- Scaredy-shroom
- Magnet-shroom (optional; probably should have it)
- Hypno-shroom (optional)
- Ice-shroom (optional)
- Doom-shroom (optional)
- Gloom-shroom (optional)
Don't use any Gold Magnets. Focus on Sun-shrooms (two columns) and Puff-shrooms first. Plant Scaredy-shrooms in the third column for Conehead Zombies. Use Grave Busters and replace Puff-shrooms with Fume-shrooms. Here are three planting diagrams:
This diagram (first time):
S S SC PS PS PS
S S SC PS PS PS
S S SC PS PS PS
S S SC PS PS PS
S S SC PS PS PS
Second diagram:
S S SC FS PS PS
S S SC FS PS PS
S S SC FS PS PS
S S SC FS PS PS
S S SC FS PS PS
Third diagram (do this in the second flag if not completed):
S S SS FS PS FS
S S SS FS PS FS
>S S SS FS PS FS
S S SS FS PS FS
>S S SS FS PS FS
- S = Sun-shroom
- SS = Scaredy-shroom
- FS = Fume-shroom
- PS = Puff-shroom
Don't replace the Puff-shrooms with Fume-shrooms in the fifth column.
Step 2
Create the third diagram above. But choose these:
- Fume-shroom
- Imitater Fume-shroom (don’t have an Imitater? Use a Jalapeno)
- Magnet-shroom
- Grave Buster
- Gloom-shroom
- Pumpkin (optional)
- Squash (optional)
- Hypno-shroom (optional)
- Ice-shroom (optional)
- Doom-shroom (optional)
After the third diagram, you will now know about the fifth column. Replace the Puff-shrooms with Magnet-shrooms, kill Football Zombies, and upgrade the front Fume-shrooms to Gloom-shrooms but not the Fume-shrooms in the fourth column. Just do this and use the optional plants if needed. The diagram should look like this:
S S SC FS MS FS
S S SC FS MS GS
S S SC FS MS GS
S S SC FS MS GS
S S SC FS MS FS
- MS = Magnet-shroom
- GS = Gloom-shroom
Step 3
Plant:
- Gloom-shroom
- Grave Buster
- Anything else besides Gold Magnets
The last two Fume-shrooms at the front should be replaced by Gloom-shrooms.
Step 4
Plant these:
- Grave Buster
- Pumpkin
- Fume-shroom (in case)
- Gloom-shroom (in case)
- Anything but Gold Magnet
If a Backup Dancer eats a Gloom-shroom, just plant another Fume-shroom and upgrade it. Use Pumpkins on Gloom-shrooms and do this in the final step if incomplete.
Finale
Plants:
- Grave Buster
- Magnet-shroom (in case)
- Pumpkin
- Anything but Gold Magnet
Put Pumpkins on Magnets due to the Pole Vaulting Zombies.
Tomtomdevil's Strategy
Plants:
- Sun-shroom
- Puff-shroom
- Fume-shroom
- Magnet-shroom
- Grave Buster
- Wall-nut or Tall-nut
- Cherry Bomb
- Squash
- Gloom-shroom (if you don't have it, use Doom-shroom and if you have nine seed slots)
- Jalapeno (if you have ten seed slots)
Quickly plant Sun-shrooms and Puff-shrooms ASAP. When you finish planting two columns of Sun-shrooms, use Grave Busters to destroy graves. Then plant three columns of Fume-shrooms. When there are Buckethead zombies, plant a column of Magnet-shrooms. After that, plant a column of Wall-nuts or Tall-nuts. Use instant-kill plants whenever you are in trouble.
Monopolypark's strategy
Plants needed:
- Sun-shroom
- Imitater Sun-shroom
- Potato Mine
- Squash
- Fume-shroom
- Pumpkin
- Puff-shroom
- Grave Buster
- Starfruit
Note: Squash, Potato Mine and Puff-shroom are needed in this process.
Plant Sun-shrooms as fast as you can in the three leftmost columns. In column five and six, plant Fume-shrooms that are guarded with Pumpkins. Eliminate the graves as fast as possible. In column five, plant Starfruits.
In flag two, plant Spikeweeds in the front most three columns. Also, replace all of the Sun-shrooms with Starfruits.
Gallery
")
")
")
")
")
")
")
")
")
")
")
")
")
")
Walkthrough
 Ep.55 (34 KB)")
 - Survival Night Gameplay Playthrough (30 KB)")
| V · T · E |
| Normal | Day ^ · Night · Pool · Fog · Roof · Great Wall |
| Hard | Day ^ · Night ^ · Pool · Fog ^ · Roof ^ |
| Endless | Day ^ · Night ^ · Pool ^ · Fog ^ · Roof ^ · Night Roof ^ · Dr. Zomboss's Revenge · Column Like You See 'Em · Great Wall · Great Wall (Night) · Great Wall (Pool) · Great Wall (Fog) |
| Galleries | General · Icons · Survival: Endless |
| ^: Strategy page |