mNo edit summary |
mNo edit summary |
||
| (5 intermediate revisions by 4 users not shown) | |||
| Line 2: | Line 2: | ||
:''For other uses, see [[Plants]].'' |
:''For other uses, see [[Plants]].'' |
||
[[File:0 garden warfare.jpg|thumb|250px]] |
[[File:0 garden warfare.jpg|thumb|250px]] |
||
| − | '''Plants''' are characters in ''[[Plants vs. Zombies: Garden Warfare]]''. The goal of the game is to defend gardens, vanquish zombies, or set gnome bombs, depending on the game mode |
+ | '''Plants''' are characters in ''[[Plants vs. Zombies: Garden Warfare]]''. The goal of the game is to defend gardens, vanquish zombies, or set gnome bombs, depending on the game mode. |
==Playable plants== |
==Playable plants== |
||
| − | There are four playable |
+ | There are four playable plant classes: [[Peashooter (PvZ: GW)|Peashooter]], [[Chomper (PvZ: GW)|Chomper]], [[Cactus (PvZ: GW)|Cactus]], and [[Sunflower (PvZ: GW)|Sunflower]]. All four have different abilities with different perks to using them. In a traditional shooter game, Peashooter serves as the basic assault class, Sunflower serves as the healer class, Chomper serves as the melee class, Cactus serves as the sniper class, and Crazy Dave serves as the boss class. |
{| class="article-table" border="1" cellpadding="1" cellspacing="1" style="width: 100%; height: 100%;" |
{| class="article-table" border="1" cellpadding="1" cellspacing="1" style="width: 100%; height: 100%;" |
||
|- |
|- |
||
| Line 14: | Line 14: | ||
! scope="col" style="text-align:center;" |Variants |
! scope="col" style="text-align:center;" |Variants |
||
! scope="col" style="text-align:center;" |Primary weapon |
! scope="col" style="text-align:center;" |Primary weapon |
||
| − | ! scope="col" style="text-align:center;" |Primary weapon damage |
+ | ! scope="col" style="text-align:center;" |Primary weapon damage<abbr title="*exact damage varies depending on distance">*</abbr> |
! scope="col" style="text-align:center;" |Abilities |
! scope="col" style="text-align:center;" |Abilities |
||
! scope="col" style="text-align:center;" |Classic FPS Class |
! scope="col" style="text-align:center;" |Classic FPS Class |
||
|- |
|- |
||
| − | ! scope="row" style="text-align:center;" |[[Peashooter ( |
+ | ! scope="row" style="text-align:center;" |[[Peashooter (PvZ: GW)|Peashooter]] |
| style="text-align:center;" |[[File:PeashooterGW1.png]] |
| style="text-align:center;" |[[File:PeashooterGW1.png]] |
||
| style="text-align:center;" |[[File:PeashooterUpgrades.png|175px]] |
| style="text-align:center;" |[[File:PeashooterUpgrades.png|175px]] |
||
| Line 24: | Line 24: | ||
| style="text-align:center;" |[[Fire Pea]]<br>[[Ice Pea]]<br>[[Toxic Pea]]<br>[[Commando Pea]]<br>[[Agent Pea]]<br>[[Law Pea]]<br>[[Berry Shooter]]<br>[[Plasma Pea]] |
| style="text-align:center;" |[[Fire Pea]]<br>[[Ice Pea]]<br>[[Toxic Pea]]<br>[[Commando Pea]]<br>[[Agent Pea]]<br>[[Law Pea]]<br>[[Berry Shooter]]<br>[[Plasma Pea]] |
||
| style="text-align:center;" |Pea Cannon |
| style="text-align:center;" |Pea Cannon |
||
| − | | style="text-align:center;" |25-37 (impact/critical damage |
+ | | style="text-align:center;" |25-37 (impact/critical damage)<br>10 (splash damage) |
| style="text-align:center;" |[[Chili Bean Bomb]]<br>[[Pea Gatling]]<br>[[Hyper]]<br>[[Sombrero Bean Bomb]]<br>[[Retro Gatling]]<br>[[Super Pea Jump]] |
| style="text-align:center;" |[[Chili Bean Bomb]]<br>[[Pea Gatling]]<br>[[Hyper]]<br>[[Sombrero Bean Bomb]]<br>[[Retro Gatling]]<br>[[Super Pea Jump]] |
||
| style="text-align:center;" |Soldier class |
| style="text-align:center;" |Soldier class |
||
|- |
|- |
||
| − | ! scope="row" style="text-align:center;" |[[Sunflower ( |
+ | ! scope="row" style="text-align:center;" |[[Sunflower (PvZ: GW)|Sunflower]] |
| style="text-align:center;" |[[File:SunflowerGW1.png]] |
| style="text-align:center;" |[[File:SunflowerGW1.png]] |
||
| style="text-align:center;" |[[File:SunflowerUpgrade.png|175px]] |
| style="text-align:center;" |[[File:SunflowerUpgrade.png|175px]] |
||
| Line 38: | Line 38: | ||
| style="text-align:center;" |Healer class |
| style="text-align:center;" |Healer class |
||
|- |
|- |
||
| − | ! scope="row" style="text-align:center;" |[[Chomper ( |
+ | ! scope="row" style="text-align:center;" |[[Chomper (PvZ: GW)|Chomper]] |
| style="text-align:center;" |[[File:ChomperGW1.png]] |
| style="text-align:center;" |[[File:ChomperGW1.png]] |
||
| style="text-align:center;" |[[File:ChomperUpgrade.png|175px]] |
| style="text-align:center;" |[[File:ChomperUpgrade.png|175px]] |
||
| Line 44: | Line 44: | ||
| style="text-align:center;" |[[Hot Rod Chomper]]<br>[[Toxic Chomper]]<br>[[Fire Chomper]]<br>[[Power Chomper]]<br>[[Count Chompula]]<br>[[Armor Chomper]]<br>[[Chester Chomper]]<br>[[Chomp Thing]] |
| style="text-align:center;" |[[Hot Rod Chomper]]<br>[[Toxic Chomper]]<br>[[Fire Chomper]]<br>[[Power Chomper]]<br>[[Count Chompula]]<br>[[Armor Chomper]]<br>[[Chester Chomper]]<br>[[Chomp Thing]] |
||
| style="text-align:center;" |Chomp |
| style="text-align:center;" |Chomp |
||
| − | | style="text-align:center;" |25 |
+ | | style="text-align:center;" |25 |
| style="text-align:center;" |[[Goop]]<br>[[Burrow]]<br>[[Spikeweed (Ability)|Spikeweed]]<br>[[Super Sticky Goop]]<br>[[Sprint Burrow]]<br>[[Spiky Spikeweed]]<br>[[Cheesy Goop]]<br>[[Chesterweed]] |
| style="text-align:center;" |[[Goop]]<br>[[Burrow]]<br>[[Spikeweed (Ability)|Spikeweed]]<br>[[Super Sticky Goop]]<br>[[Sprint Burrow]]<br>[[Spiky Spikeweed]]<br>[[Cheesy Goop]]<br>[[Chesterweed]] |
||
| style="text-align:center;" |Melee class |
| style="text-align:center;" |Melee class |
||
|- |
|- |
||
| − | ! scope="row" style="text-align:center;" |[[Cactus ( |
+ | ! scope="row" style="text-align:center;" |[[Cactus (PvZ: GW)|Cactus]] |
| style="text-align:center;" |[[File:CactusGW1.png]] |
| style="text-align:center;" |[[File:CactusGW1.png]] |
||
| style="text-align:center;" |[[File:CactusUpgrade.png|175px]] |
| style="text-align:center;" |[[File:CactusUpgrade.png|175px]] |
||
| Line 58: | Line 58: | ||
| style="text-align:center;" |Sniper class |
| style="text-align:center;" |Sniper class |
||
|- |
|- |
||
| − | ! scope="row" style="text-align:center;" |[[Crazy Dave]] |
+ | ! scope="row" style="text-align:center;" |[[Crazy Dave (PvZ: GW)|Crazy Dave]] |
| − | | style="text-align:center;" |[[File:Crazy.png |
+ | | style="text-align:center;" |[[File:Crazy DaveGW1.png]] |
| style="text-align:center;" |N/A |
| style="text-align:center;" |N/A |
||
| style="text-align:center;" |2000 |
| style="text-align:center;" |2000 |
||
| Line 65: | Line 65: | ||
| style="text-align:center;" |N/A |
| style="text-align:center;" |N/A |
||
| style="text-align:center;" |N/A |
| style="text-align:center;" |N/A |
||
| − | | style="text-align:center;" |[[Coconut Spotting Station]]<br |
+ | | style="text-align:center;" |[[Coconut Spotting Station]]<br>[[Twin Heal Flower]]<br>[[Cherry Strike]]<br>[[Revive Rainbow]] |
| style="text-align:center;" |Boss class |
| style="text-align:center;" |Boss class |
||
|} |
|} |
||
| + | <small>*exact damage varies depending on distance</small> |
||
==Variant plants== |
==Variant plants== |
||
| Line 80: | Line 81: | ||
! scope="col" style="text-align:center;" |[[Health]] |
! scope="col" style="text-align:center;" |[[Health]] |
||
! scope="col" style="text-align:center;" |Primary weapon |
! scope="col" style="text-align:center;" |Primary weapon |
||
| − | ! scope="col" style="text-align:center;" |Primary weapon damage |
+ | ! scope="col" style="text-align:center;" |Primary weapon damage<abbr title="*exact damage varies depending on distance">*</abbr> |
|- |
|- |
||
! scope="row" style="text-align:center;" |[[Fire Pea]] |
! scope="row" style="text-align:center;" |[[Fire Pea]] |
||
| Line 87: | Line 88: | ||
| style="text-align:center;" |125 |
| style="text-align:center;" |125 |
||
| style="text-align:center;" |Fire Pea Cannon |
| style="text-align:center;" |Fire Pea Cannon |
||
| − | | style="text-align:center;" |15-19 (impact damage |
+ | | style="text-align:center;" |15-19 (impact damage) 21-26 (critical damage)<br>10 (splash damage)<br>5 (fire damage per second) |
|- |
|- |
||
! scope="row" style="text-align:center;" |[[Ice Pea]] |
! scope="row" style="text-align:center;" |[[Ice Pea]] |
||
| Line 94: | Line 95: | ||
| style="text-align:center;" |125 |
| style="text-align:center;" |125 |
||
| style="text-align:center;" |Ice Pea Cannon |
| style="text-align:center;" |Ice Pea Cannon |
||
| − | | style="text-align:center;" |15-19 (impact damage |
+ | | style="text-align:center;" |15-19 (impact damage) 21-25 (critical damage)<br>10 (splash damage) |
|- |
|- |
||
! scope="row" style="text-align:center;" |[[Toxic Pea]] |
! scope="row" style="text-align:center;" |[[Toxic Pea]] |
||
| Line 101: | Line 102: | ||
| style="text-align:center;" |125 |
| style="text-align:center;" |125 |
||
| style="text-align:center;" |Toxic Pea Cannon |
| style="text-align:center;" |Toxic Pea Cannon |
||
| − | | style="text-align:center;" | |
+ | | style="text-align:center;" |17-26 (impact/critical damage)<br>10 (splash damage)<br>2 (toxic damage per second or being close to enemy) |
|- |
|- |
||
! scope="row" style="text-align:center;" |[[Commando Pea]] |
! scope="row" style="text-align:center;" |[[Commando Pea]] |
||
| Line 108: | Line 109: | ||
| style="text-align:center;" |125 |
| style="text-align:center;" |125 |
||
| style="text-align:center;" |Full-Auto Pea |
| style="text-align:center;" |Full-Auto Pea |
||
| − | | style="text-align:center;" |6-12 (impact damage |
+ | | style="text-align:center;" |6-12 (impact damage)<br>6-13 (critical damage) |
|- |
|- |
||
! scope="row" style="text-align:center;" |[[Agent Pea]] |
! scope="row" style="text-align:center;" |[[Agent Pea]] |
||
| Line 115: | Line 116: | ||
| style="text-align:center;" |100 |
| style="text-align:center;" |100 |
||
| style="text-align:center;" |Pea Silencer |
| style="text-align:center;" |Pea Silencer |
||
| − | | style="text-align:center;" |10-16 (impact damage |
+ | | style="text-align:center;" |10-16 (impact damage)<br>20-33 (critical damage) |
|- |
|- |
||
! scope="row" style="text-align:center;" |[[Law Pea]] |
! scope="row" style="text-align:center;" |[[Law Pea]] |
||
| Line 122: | Line 123: | ||
| style="text-align:center;" |125 |
| style="text-align:center;" |125 |
||
| style="text-align:center;" |Six Shooter |
| style="text-align:center;" |Six Shooter |
||
| − | | style="text-align:center;" |13-22 (impact damage |
+ | | style="text-align:center;" |13-22 (impact damage)<br>15-26 (critical damage) |
|- |
|- |
||
! scope="row" style="text-align:center;" |[[Berry Shooter]] |
! scope="row" style="text-align:center;" |[[Berry Shooter]] |
||
| Line 129: | Line 130: | ||
| style="text-align:center;" |125 |
| style="text-align:center;" |125 |
||
| style="text-align:center;" |Berry Blast |
| style="text-align:center;" |Berry Blast |
||
| − | | style="text-align:center;" |20-35 (impact/critical damage |
+ | | style="text-align:center;" |20-35 (impact/critical damage)<br>1-15 (splash damage) |
|- |
|- |
||
! scope="row" style="text-align:center;" |[[Plasma Pea]] |
! scope="row" style="text-align:center;" |[[Plasma Pea]] |
||
| Line 138: | Line 139: | ||
| style="text-align:center;" |20-70 (impact/critical damage, based on charge rate)<br>10-30 (splash damage, based on charge rate) |
| style="text-align:center;" |20-70 (impact/critical damage, based on charge rate)<br>10-30 (splash damage, based on charge rate) |
||
|} |
|} |
||
| + | <small>*exact damage varies depending on distance</small> |
||
| + | |||
===Sunflower=== |
===Sunflower=== |
||
| Line 147: | Line 150: | ||
! scope="col" style="text-align:center;" |[[Health]] |
! scope="col" style="text-align:center;" |[[Health]] |
||
! scope="col" style="text-align:center;" |Primary weapon |
! scope="col" style="text-align:center;" |Primary weapon |
||
| − | ! scope="col" style="text-align:center;" |Primary weapon damage |
+ | ! scope="col" style="text-align:center;" |Primary weapon damage<abbr title="*exact damage varies depending on distance">*</abbr> |
|- |
|- |
||
! scope="row" style="text-align:center;" |[[Mystic Flower]] |
! scope="row" style="text-align:center;" |[[Mystic Flower]] |
||
| Line 154: | Line 157: | ||
| style="text-align:center;" |100 |
| style="text-align:center;" |100 |
||
| style="text-align:center;" |Mysterious Energy |
| style="text-align:center;" |Mysterious Energy |
||
| − | | style="text-align:center;" |11-40 |
+ | | style="text-align:center;" |11-40 (impact damage, based on charge rate)<br>13-80 (critical damage, based on charge rate) |
|- |
|- |
||
! scope="row" style="text-align:center;" |[[Power Flower]] |
! scope="row" style="text-align:center;" |[[Power Flower]] |
||
| Line 161: | Line 164: | ||
| style="text-align:center;" |100 |
| style="text-align:center;" |100 |
||
| style="text-align:center;" |Power Pulse |
| style="text-align:center;" |Power Pulse |
||
| − | | style="text-align:center;" |6-8 (impact damage |
+ | | style="text-align:center;" |6-8 (impact damage)<br>7-9 (critical damage)<br>5-7 (electric splash) |
|- |
|- |
||
! scope="row" style="text-align:center;" |[[Fire Flower]] |
! scope="row" style="text-align:center;" |[[Fire Flower]] |
||
| Line 168: | Line 171: | ||
| style="text-align:center;" |100 |
| style="text-align:center;" |100 |
||
| style="text-align:center;" |Flame Pulse |
| style="text-align:center;" |Flame Pulse |
||
| − | | style="text-align:center;" |4-7 (impact damage |
+ | | style="text-align:center;" |4-7 (impact damage)<br>5-9 (critical damage)<br>5 (fire damage per second) |
|- |
|- |
||
! scope="row" style="text-align:center;" |[[Shadow Flower]] |
! scope="row" style="text-align:center;" |[[Shadow Flower]] |
||
| Line 175: | Line 178: | ||
| style="text-align:center;" |100 |
| style="text-align:center;" |100 |
||
| style="text-align:center;" |Dark Energy |
| style="text-align:center;" |Dark Energy |
||
| − | | style="text-align:center;" |7-8 (impact damage |
+ | | style="text-align:center;" |7-8 (impact damage)<br>9-10 (critical damage) |
|- |
|- |
||
! scope="row" style="text-align:center;" |[[Metal Petal]] |
! scope="row" style="text-align:center;" |[[Metal Petal]] |
||
| Line 189: | Line 192: | ||
| style="text-align:center;" |100 |
| style="text-align:center;" |100 |
||
| style="text-align:center;" |Cobra Laser |
| style="text-align:center;" |Cobra Laser |
||
| − | | style="text-align:center;" |10-13 (impact damage |
+ | | style="text-align:center;" |10-13 (impact damage)<br>12-15 (critical damage) |
|- |
|- |
||
! scope="row" style="text-align:center;" |[[Alien Flower]] |
! scope="row" style="text-align:center;" |[[Alien Flower]] |
||
| Line 196: | Line 199: | ||
| style="text-align:center;" |100 |
| style="text-align:center;" |100 |
||
| style="text-align:center;" |Spore Mist |
| style="text-align:center;" |Spore Mist |
||
| − | | style="text-align:center;" |10-14 (impact damage |
+ | | style="text-align:center;" |10-14 (impact damage)<br>15-18 (critical damage)<br>3 (spore damage) |
|} |
|} |
||
| + | <small>*exact damage varies depending on distance</small> |
||
| + | |||
===Chomper=== |
===Chomper=== |
||
| Line 214: | Line 219: | ||
| style="text-align:center;" |100<br>125 <small>(upgrade)</small> |
| style="text-align:center;" |100<br>125 <small>(upgrade)</small> |
||
| style="text-align:center;" |Hot Rod Chomp |
| style="text-align:center;" |Hot Rod Chomp |
||
| − | | style="text-align:center;" |25 (chomp |
+ | | style="text-align:center;" |25 (chomp) |
|- |
|- |
||
! scope="row" style="text-align:center;" |[[Toxic Chomper]] |
! scope="row" style="text-align:center;" |[[Toxic Chomper]] |
||
| Line 221: | Line 226: | ||
| style="text-align:center;" |150<br>175 <small>(upgrade)</small> |
| style="text-align:center;" |150<br>175 <small>(upgrade)</small> |
||
| style="text-align:center;" |Toxic Spray |
| style="text-align:center;" |Toxic Spray |
||
| − | | style="text-align:center;" |6-8 (toxic spray |
+ | | style="text-align:center;" |6-8 (toxic spray)<br>2-5 (toxic damage per second or being close to enemy) |
|- |
|- |
||
! scope="row" style="text-align:center;" |[[Fire Chomper]] |
! scope="row" style="text-align:center;" |[[Fire Chomper]] |
||
| Line 228: | Line 233: | ||
| style="text-align:center;" |150<br>175 <small>(upgrade)</small> |
| style="text-align:center;" |150<br>175 <small>(upgrade)</small> |
||
| style="text-align:center;" |Flame Spray |
| style="text-align:center;" |Flame Spray |
||
| − | | style="text-align:center;" |8-10 ( |
+ | | style="text-align:center;" |8-10 (spray)<br>5 (fire damage per second) |
|- |
|- |
||
! scope="row" style="text-align:center;" |[[Power Chomper]] |
! scope="row" style="text-align:center;" |[[Power Chomper]] |
||
| Line 235: | Line 240: | ||
| style="text-align:center;" |150<br>175 <small>(upgrade)</small> |
| style="text-align:center;" |150<br>175 <small>(upgrade)</small> |
||
| style="text-align:center;" |Electric Spray |
| style="text-align:center;" |Electric Spray |
||
| − | | style="text-align:center;" |10 ( |
+ | | style="text-align:center;" |10 (spray)<br>2 (splash) |
|- |
|- |
||
! scope="row" style="text-align:center;" |[[Count Chompula]] |
! scope="row" style="text-align:center;" |[[Count Chompula]] |
||
| Line 242: | Line 247: | ||
| style="text-align:center;" |125<br>150 <small>(upgrade)</small> |
| style="text-align:center;" |125<br>150 <small>(upgrade)</small> |
||
| style="text-align:center;" |Vampiric Chomp |
| style="text-align:center;" |Vampiric Chomp |
||
| − | | style="text-align:center;" |25 |
+ | | style="text-align:center;" |25 |
|- |
|- |
||
! scope="row" style="text-align:center;" |[[Armor Chomper]] |
! scope="row" style="text-align:center;" |[[Armor Chomper]] |
||
| Line 249: | Line 254: | ||
| style="text-align:center;" |200<br>225 <small>(upgrade)</small> |
| style="text-align:center;" |200<br>225 <small>(upgrade)</small> |
||
| style="text-align:center;" |Metal Chomp |
| style="text-align:center;" |Metal Chomp |
||
| − | | style="text-align:center;" |50-60 |
+ | | style="text-align:center;" |50-60 |
|- |
|- |
||
! scope="row" style="text-align:center;" |[[Chester Chomper]] |
! scope="row" style="text-align:center;" |[[Chester Chomper]] |
||
| Line 256: | Line 261: | ||
| style="text-align:center;" |125<br>150 <small>(upgrade)</small> |
| style="text-align:center;" |125<br>150 <small>(upgrade)</small> |
||
| style="text-align:center;" |Cheesy Chomp |
| style="text-align:center;" |Cheesy Chomp |
||
| − | | style="text-align:center;" |25 |
+ | | style="text-align:center;" |25 |
|- |
|- |
||
! scope="row" style="text-align:center;" |[[Chomp Thing]] |
! scope="row" style="text-align:center;" |[[Chomp Thing]] |
||
| Line 263: | Line 268: | ||
| style="text-align:center;" |100<br>125 <small>(upgrade)</small> |
| style="text-align:center;" |100<br>125 <small>(upgrade)</small> |
||
| style="text-align:center;" |Swamp Spray |
| style="text-align:center;" |Swamp Spray |
||
| − | | style="text-align:center;" |5-12 |
+ | | style="text-align:center;" |5-12 |
|} |
|} |
||
| + | |||
===Cactus=== |
===Cactus=== |
||
| Line 274: | Line 280: | ||
! scope="col" style="text-align:center;" |[[Health]] |
! scope="col" style="text-align:center;" |[[Health]] |
||
! scope="col" style="text-align:center;" |Primary weapon |
! scope="col" style="text-align:center;" |Primary weapon |
||
| − | ! scope="col" style="text-align:center;" |Primary weapon damage |
+ | ! scope="col" style="text-align:center;" |Primary weapon damage<abbr title="*exact damage varies depending on distance">*</abbr> |
|- |
|- |
||
! scope="row" style="text-align:center;" |[[Camo Cactus]] |
! scope="row" style="text-align:center;" |[[Camo Cactus]] |
||
| Line 288: | Line 294: | ||
| style="text-align:center;" |125 |
| style="text-align:center;" |125 |
||
| style="text-align:center;" |Fire Needle |
| style="text-align:center;" |Fire Needle |
||
| − | | style="text-align:center;" |16-22 (impact damage |
+ | | style="text-align:center;" |16-22 (impact damage)<br>23-30 (critical damage)<br>5 (fire damage per second) |
|- |
|- |
||
! scope="row" style="text-align:center;" |[[Ice Cactus]] |
! scope="row" style="text-align:center;" |[[Ice Cactus]] |
||
| Line 295: | Line 301: | ||
| style="text-align:center;" |125 |
| style="text-align:center;" |125 |
||
| style="text-align:center;" |Ice Needle |
| style="text-align:center;" |Ice Needle |
||
| − | | style="text-align:center;" |15-22 (impact damage |
+ | | style="text-align:center;" |15-22 (impact damage)<br>16-26 (critical damage) |
|- |
|- |
||
! scope="row" style="text-align:center;" |[[Power Cactus]] |
! scope="row" style="text-align:center;" |[[Power Cactus]] |
||
| Line 302: | Line 308: | ||
| style="text-align:center;" |125 |
| style="text-align:center;" |125 |
||
| style="text-align:center;" |Electric Needle |
| style="text-align:center;" |Electric Needle |
||
| − | | style="text-align:center;" |15-22 (impact damage |
+ | | style="text-align:center;" |15-22 (impact damage)<br>18-27 (critical damage)<br>3-7 (electric splash) |
|- |
|- |
||
! scope="row" style="text-align:center;" |[[Future Cactus]] |
! scope="row" style="text-align:center;" |[[Future Cactus]] |
||
| Line 309: | Line 315: | ||
| style="text-align:center;" |125 |
| style="text-align:center;" |125 |
||
| style="text-align:center;" |Future Shot |
| style="text-align:center;" |Future Shot |
||
| − | | style="text-align:center;" |10-94 (impact damage |
+ | | style="text-align:center;" |10-94 (impact damage)<br>20-107 (critical damage)<br>30 (splash damage, fully charged projectile only) |
| − | |||
| − | 30 (splash damage, fully charged projectile only) |
||
|- |
|- |
||
! scope="row" style="text-align:center;" |[[Bandit Cactus]] |
! scope="row" style="text-align:center;" |[[Bandit Cactus]] |
||
| Line 325: | Line 329: | ||
| style="text-align:center;" |125 |
| style="text-align:center;" |125 |
||
| style="text-align:center;" |Orange Burst |
| style="text-align:center;" |Orange Burst |
||
| − | | style="text-align:center;" |13-17 (impact/critical damage |
+ | | style="text-align:center;" |13-17 (impact/critical damage)<br>5-15 (splash damage) |
|- |
|- |
||
! scope="row" style="text-align:center;" |[[Jade Cactus]] |
! scope="row" style="text-align:center;" |[[Jade Cactus]] |
||
| Line 332: | Line 336: | ||
| style="text-align:center;" |150 |
| style="text-align:center;" |150 |
||
| style="text-align:center;" |Shatter Shot |
| style="text-align:center;" |Shatter Shot |
||
| − | | style="text-align:center;" |11-26 (impact damage |
+ | | style="text-align:center;" |11-26 (impact damage)<br>13-38 (critical damage, based on distance)<br>15 (splash damage) |
|} |
|} |
||
| + | <small>*exact damage varies depending on distance</small> |
||
| + | |||
==Ability plants== |
==Ability plants== |
||
| Line 341: | Line 347: | ||
! scope="row" style="text-align:center;" |Plant |
! scope="row" style="text-align:center;" |Plant |
||
! scope="col" style="text-align:center;" |Image |
! scope="col" style="text-align:center;" |Image |
||
| − | ! scope="col" style="text-align:center;" |Ability |
+ | ! scope="col" style="text-align:center;" |Ability for |
|- |
|- |
||
! scope="row" style="text-align:center;" |[[Chili Bean Bomb]] |
! scope="row" style="text-align:center;" |[[Chili Bean Bomb]] |
||
| − | | style="text-align:center;" |[[File: |
+ | | style="text-align:center;" |[[File:Chili Bean BombGW1.png]] |
| style="text-align:center;" |Peashooter |
| style="text-align:center;" |Peashooter |
||
|- |
|- |
||
! scope="row" style="text-align:center;" |[[Sombrero Bean Bomb]] |
! scope="row" style="text-align:center;" |[[Sombrero Bean Bomb]] |
||
| − | | style="text-align:center;" |[[File: |
+ | | style="text-align:center;" |[[File:Sombrero Bean BombGW1.png]] |
| style="text-align:center;" |Peashooter |
| style="text-align:center;" |Peashooter |
||
|- |
|- |
||
! scope="row" style="text-align:center;" |[[Heal Flower]] |
! scope="row" style="text-align:center;" |[[Heal Flower]] |
||
| − | | style="text-align:center;" |[[File: |
+ | | style="text-align:center;" |[[File:Heal Flower AbilityGW1.png]] |
| style="text-align:center;" |Sunflower |
| style="text-align:center;" |Sunflower |
||
|- |
|- |
||
! scope="row" style="text-align:center;" |[[Dark Flower]] |
! scope="row" style="text-align:center;" |[[Dark Flower]] |
||
| − | | style="text-align:center;" |[[File: |
+ | | style="text-align:center;" |[[File:Dark FlowerGW1.png]] |
| style="text-align:center;" |Sunflower |
| style="text-align:center;" |Sunflower |
||
|- |
|- |
||
! scope="row" style="text-align:center;" |[[Spikeweed (Ability)|Spikeweed]] |
! scope="row" style="text-align:center;" |[[Spikeweed (Ability)|Spikeweed]] |
||
| − | | style="text-align:center;" |[[File: |
+ | | style="text-align:center;" |[[File:SpikeweedGW1.png]] |
| style="text-align:center;" |Chomper |
| style="text-align:center;" |Chomper |
||
|- |
|- |
||
! scope="row" style="text-align:center;" |[[Spiky Spikeweed]] |
! scope="row" style="text-align:center;" |[[Spiky Spikeweed]] |
||
| − | | style="text-align:center;" |[[File: |
+ | | style="text-align:center;" |[[File:Spiky SpikeweedGW1.png]] |
| ⚫ | |||
| ⚫ | |||
| ⚫ | |||
| ⚫ | |||
| style="text-align:center;" |Chomper |
| style="text-align:center;" |Chomper |
||
|- |
|- |
||
! scope="row" style="text-align:center;" |[[Potato Mine (Ability)|Potato Mine]] |
! scope="row" style="text-align:center;" |[[Potato Mine (Ability)|Potato Mine]] |
||
| − | | style="text-align:center;" |[[File: |
+ | | style="text-align:center;" |[[File:Potato MineGW1.png]] |
| style="text-align:center;" |Cactus |
| style="text-align:center;" |Cactus |
||
|- |
|- |
||
! scope="row" style="text-align:center;" |[[Garlic Drone]] |
! scope="row" style="text-align:center;" |[[Garlic Drone]] |
||
| − | | style="text-align:center;" |[[File: |
+ | | style="text-align:center;" |[[File:Garlic DroneGW1.png]] |
| style="text-align:center;" |Cactus |
| style="text-align:center;" |Cactus |
||
|- |
|- |
||
! scope="row" style="text-align:center;" |[[Tallnut Battlement]] |
! scope="row" style="text-align:center;" |[[Tallnut Battlement]] |
||
| − | | style="text-align:center;" |[[File: |
+ | | style="text-align:center;" |[[File:Tallnut BattlementGW1.png]] |
| style="text-align:center;" |Cactus |
| style="text-align:center;" |Cactus |
||
|- |
|- |
||
! scope="row" style="text-align:center;" |[[Potato Nugget Mine]] |
! scope="row" style="text-align:center;" |[[Potato Nugget Mine]] |
||
| − | | style="text-align:center;" |[[File: |
+ | | style="text-align:center;" |[[File:Potato Nugget MineGW1.png]] |
| style="text-align:center;" |Cactus |
| style="text-align:center;" |Cactus |
||
|- |
|- |
||
! scope="row" style="text-align:center;" |[[Artichoke Drone]] |
! scope="row" style="text-align:center;" |[[Artichoke Drone]] |
||
| − | | style="text-align:center;" |[[File: |
+ | | style="text-align:center;" |[[File:Artichoke DroneGW1.png]] |
| style="text-align:center;" |Cactus |
| style="text-align:center;" |Cactus |
||
|- |
|- |
||
! scope="row" style="text-align:center;" |[[Iron Maiden]] |
! scope="row" style="text-align:center;" |[[Iron Maiden]] |
||
| − | | style="text-align:center;" |[[File: |
+ | | style="text-align:center;" |[[File:Iron MaidenGW1.png]] |
| style="text-align:center;" |Cactus |
| style="text-align:center;" |Cactus |
||
|- |
|- |
||
| − | ! scope="row" style="text-align:center;" |[[ |
+ | ! scope="row" style="text-align:center;" |[[Coconut Spotting Station]] |
| − | | style="text-align:center;" |[[File: |
+ | | style="text-align:center;" |[[File:Coconut Spotting Station GW1.png|96px]] |
| − | | style="text-align:center;" | |
+ | | style="text-align:center;" |Crazy Dave |
| ⚫ | |||
| ⚫ | |||
| ⚫ | |||
| ⚫ | |||
| ⚫ | |||
| ⚫ | |||
| ⚫ | |||
| + | | style="text-align:center;" |Crazy Dave |
||
| ⚫ | |||
| + | ! scope="row" style="text-align:center;" |[[Revive Rainbow]] |
||
| + | | style="text-align:center;" |[[File:Revive Rainbow GW1.png|96px]] |
||
| + | | style="text-align:center;" |Crazy Dave |
||
|} |
|} |
||
| Line 407: | Line 429: | ||
|- |
|- |
||
! scope="row" style="text-align:center;" |[[Pea Cannon]] |
! scope="row" style="text-align:center;" |[[Pea Cannon]] |
||
| − | | style="text-align:center;" |[[File: |
+ | | style="text-align:center;" |[[File:Pea CannonGW1.png]] |
|36 (approx.) |
|36 (approx.) |
||
|- |
|- |
||
! scope="row" style="text-align:center;" |[[Pea Repeater]] |
! scope="row" style="text-align:center;" |[[Pea Repeater]] |
||
| − | | style="text-align:center;" |[[File: |
+ | | style="text-align:center;" |[[File:Pea RepeaterGW1.png|100px]] |
|80 (approx.) |
|80 (approx.) |
||
|- |
|- |
||
! scope="row" style="text-align:center;" |[[Gatling Pea (Spawnable)|Gatling Pea]] |
! scope="row" style="text-align:center;" |[[Gatling Pea (Spawnable)|Gatling Pea]] |
||
| − | | style="text-align:center;" |[[File: |
+ | | style="text-align:center;" |[[File:Gatling PeaGW1.png]] |
|100 (approx.) |
|100 (approx.) |
||
|- |
|- |
||
! scope="row" style="text-align:center;" |[[Bonk Choy (Spawnable)|Bonk Choy]] |
! scope="row" style="text-align:center;" |[[Bonk Choy (Spawnable)|Bonk Choy]] |
||
| − | | style="text-align:center;" |[[File: |
+ | | style="text-align:center;" |[[File:Bonk ChoyGW1.png]] |
|100 (approx.) |
|100 (approx.) |
||
|- |
|- |
||
! scope="row" style="text-align:center;" |[[Scaredy-shroom (Spawnable)|Scaredy-shroom]] |
! scope="row" style="text-align:center;" |[[Scaredy-shroom (Spawnable)|Scaredy-shroom]] |
||
| − | | style="text-align:center;" |[[File: |
+ | | style="text-align:center;" |[[File:Scaredy-shroomGW1.png]] |
|70 (approx.) |
|70 (approx.) |
||
|- |
|- |
||
! scope="row" style="text-align:center;" |[[Heal Flower]] |
! scope="row" style="text-align:center;" |[[Heal Flower]] |
||
| − | | style="text-align:center;" |[[File: |
+ | | style="text-align:center;" |[[File:Heal FlowerGW1.png]] |
|61 (approx.) |
|61 (approx.) |
||
|- |
|- |
||
! scope="row" style="text-align:center;" |[[Fume-shroom (Spawnable)|Fume-shroom]] |
! scope="row" style="text-align:center;" |[[Fume-shroom (Spawnable)|Fume-shroom]] |
||
| − | | style="text-align:center;" |[[File:Fume |
+ | | style="text-align:center;" |[[File:Fume-shroomGW1.png]] |
|75 (approx.) |
|75 (approx.) |
||
|- |
|- |
||
! scope="row" style="text-align:center;" |[[Goop-shroom]] |
! scope="row" style="text-align:center;" |[[Goop-shroom]] |
||
| − | | style="text-align:center;" |[[File:Goop |
+ | | style="text-align:center;" |[[File:Goop-shroomGW1.png]] |
|100 (approx.) |
|100 (approx.) |
||
|- |
|- |
||
! scope="row" style="text-align:center;" |[[Snap Dragon]] |
! scope="row" style="text-align:center;" |[[Snap Dragon]] |
||
| − | | style="text-align:center;" |[[File: |
+ | | style="text-align:center;" |[[File:Snap DragonGW1.png]] |
|95 (approx.) |
|95 (approx.) |
||
|- |
|- |
||
! scope="row" style="text-align:center;" |[[Ice-shroom (Spawnable)|Ice-shroom]] |
! scope="row" style="text-align:center;" |[[Ice-shroom (Spawnable)|Ice-shroom]] |
||
| − | | style="text-align:center;" |[[File: |
+ | | style="text-align:center;" |[[File:Ice-shroomGW1.png]] |
|50 (approx.) |
|50 (approx.) |
||
|- |
|- |
||
! scope="row" style="text-align:center;" |[[Doom-shroom (Spawnable)|Doom-shroom]] |
! scope="row" style="text-align:center;" |[[Doom-shroom (Spawnable)|Doom-shroom]] |
||
| − | | style="text-align:center;" |[[File: |
+ | | style="text-align:center;" |[[File:Doom-shroomGW1.png]] |
|100 (approx.) |
|100 (approx.) |
||
|- |
|- |
||
! scope="row" style="text-align:center;" |[[Ice Peashooter]] |
! scope="row" style="text-align:center;" |[[Ice Peashooter]] |
||
| − | | style="text-align:center;" |[[File: |
+ | | style="text-align:center;" |[[File:Ice PeashooterGW1.png]] |
|42 (approx.) |
|42 (approx.) |
||
|- |
|- |
||
! scope="row" style="text-align:center;" |[[Fire Peashooter (Spawnable)|Fire Peashooter]] |
! scope="row" style="text-align:center;" |[[Fire Peashooter (Spawnable)|Fire Peashooter]] |
||
| − | | style="text-align:center;" |[[File: |
+ | | style="text-align:center;" |[[File:Fire PeashooterGW1.png]] |
|70 (approx.) |
|70 (approx.) |
||
|- |
|- |
||
! scope="row" style="text-align:center;" |[[Bamboo Shoot (Spawnable)|Bamboo Shoot]] |
! scope="row" style="text-align:center;" |[[Bamboo Shoot (Spawnable)|Bamboo Shoot]] |
||
| − | | style="text-align:center;" |[[File: |
+ | | style="text-align:center;" |[[File:Bamboo ShootGW1.png]] |
|50 (approx.) |
|50 (approx.) |
||
|- |
|- |
||
! scope="row" style="text-align:center;" |[[Laser Bean (Spawnable)|Laser Bean]] |
! scope="row" style="text-align:center;" |[[Laser Bean (Spawnable)|Laser Bean]] |
||
| − | | style="text-align:center;" |[[File:Laser |
+ | | style="text-align:center;" |[[File:Laser BeanGW1.png]] |
|100 (approx.) |
|100 (approx.) |
||
|} |
|} |
||
==Other plants== |
==Other plants== |
||
| − | These plants are |
+ | These plants are not playable or spawnable but appear in some maps either as a part of the environment or as interactive objects. |
{| class="article-table" border="1" cellpadding="1" cellspacing="1" style="width: 100%; height: 100%;" |
{| class="article-table" border="1" cellpadding="1" cellspacing="1" style="width: 100%; height: 100%;" |
||
|- |
|- |
||
! scope="row" style="text-align:center;" |Plant |
! scope="row" style="text-align:center;" |Plant |
||
! scope="col" style="text-align:center;" |Image |
! scope="col" style="text-align:center;" |Image |
||
| ⚫ | |||
| ⚫ | |||
| ⚫ | |||
| ⚫ | |||
| ⚫ | |||
| ⚫ | |||
| ⚫ | |||
| ⚫ | |||
| ⚫ | |||
| ⚫ | |||
| ⚫ | |||
| ⚫ | |||
|- |
|- |
||
! scope="row" style="text-align:center;" |[[Tallnut Cannon]] |
! scope="row" style="text-align:center;" |[[Tallnut Cannon]] |
||
Revision as of 15:38, 20 March 2020
- For other uses, see Plants.
Plants are characters in Plants vs. Zombies: Garden Warfare. The goal of the game is to defend gardens, vanquish zombies, or set gnome bombs, depending on the game mode.
Playable plants
There are four playable plant classes: Peashooter, Chomper, Cactus, and Sunflower. All four have different abilities with different perks to using them. In a traditional shooter game, Peashooter serves as the basic assault class, Sunflower serves as the healer class, Chomper serves as the melee class, Cactus serves as the sniper class, and Crazy Dave serves as the boss class.


*exact damage varies depending on distance
Variant plants
Each playable character class has six variants or more that give the base class a perk. The variants also differ slightly in appearance. Unlocking the variants is done through purchasing sticker packs from the Sticker Shop. Lower cost packs will result in single pieces being obtained randomly, more expensive ones will yield multiple pieces for different characters while the most expensive sticker pack will fully unlock a random new variant.
Peashooter
| Plant | Image | Weapon upgrades | Health | Primary weapon | Primary weapon damage* |
|---|---|---|---|---|---|
| Fire Pea | 
|
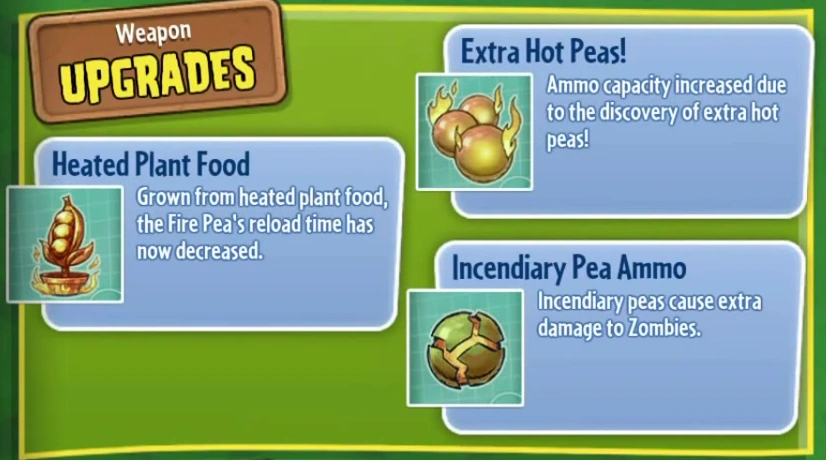
|
125 | Fire Pea Cannon | 15-19 (impact damage) 21-26 (critical damage) 10 (splash damage) 5 (fire damage per second) |
| Ice Pea | 
|
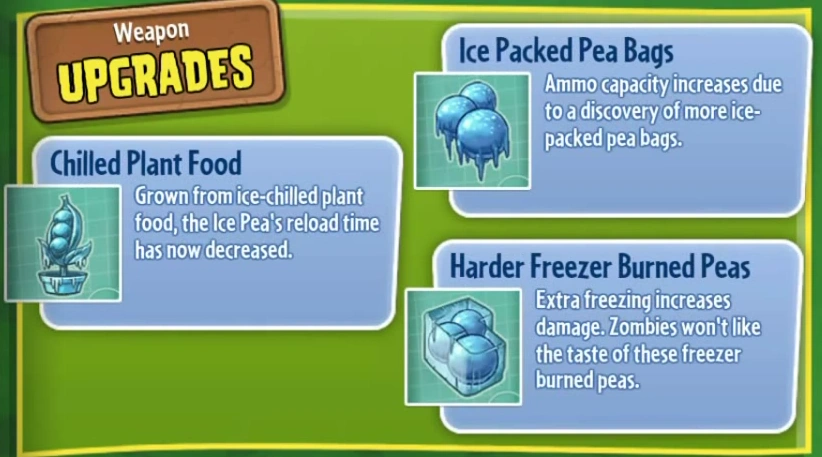
|
125 | Ice Pea Cannon | 15-19 (impact damage) 21-25 (critical damage) 10 (splash damage) |
| Toxic Pea | 
|
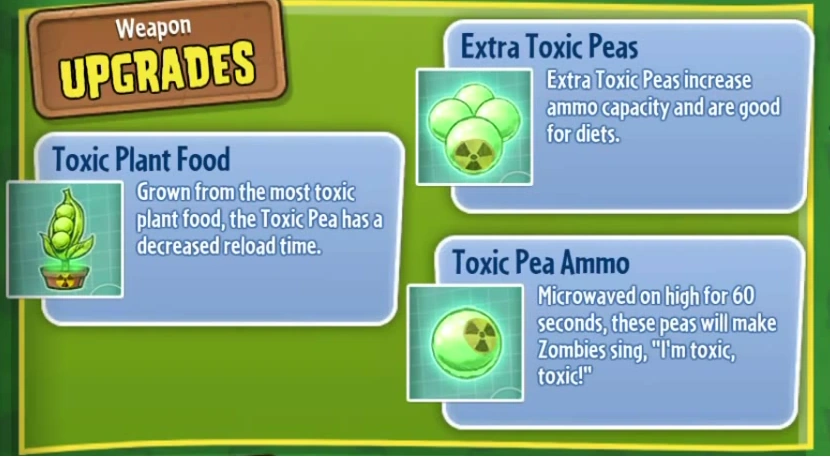
|
125 | Toxic Pea Cannon | 17-26 (impact/critical damage) 10 (splash damage) 2 (toxic damage per second or being close to enemy) |
| Commando Pea | 
|
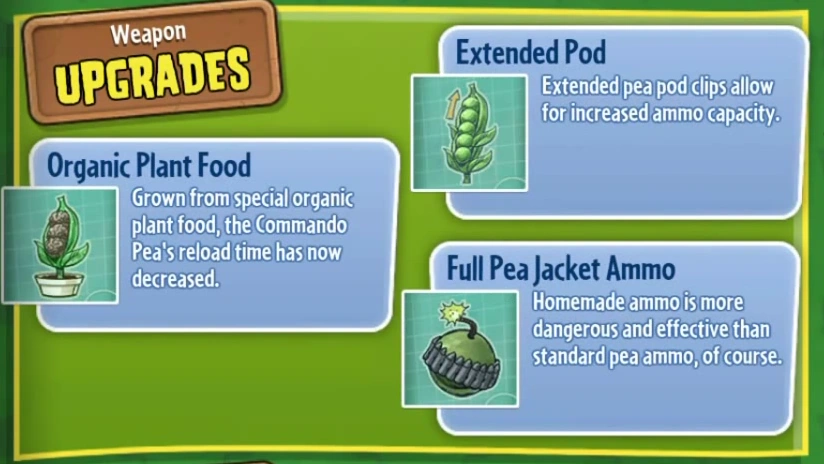
|
125 | Full-Auto Pea | 6-12 (impact damage) 6-13 (critical damage) |
| Agent Pea | 
|
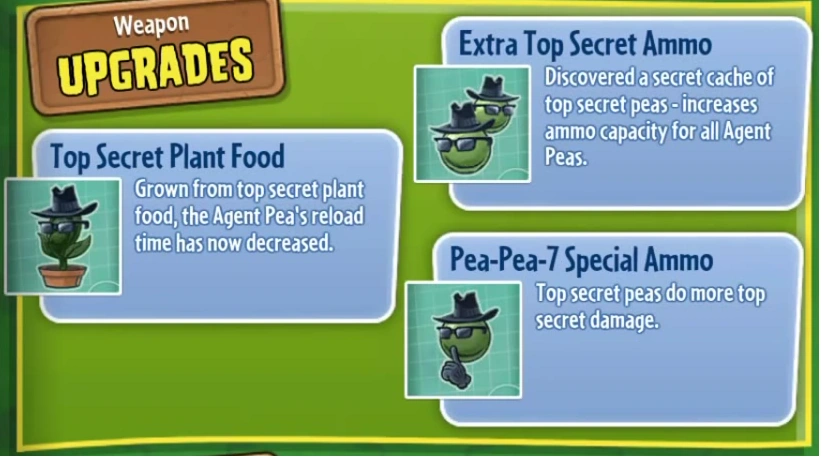
|
100 | Pea Silencer | 10-16 (impact damage) 20-33 (critical damage) |
| Law Pea | 
|
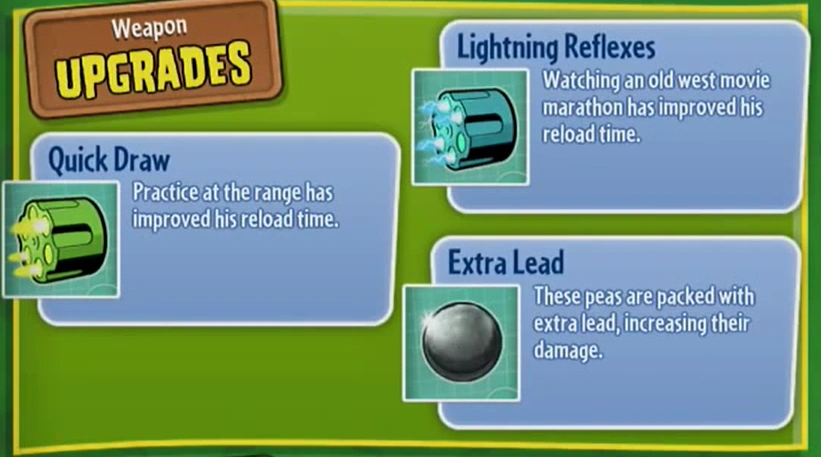
|
125 | Six Shooter | 13-22 (impact damage) 15-26 (critical damage) |
| Berry Shooter | 
|
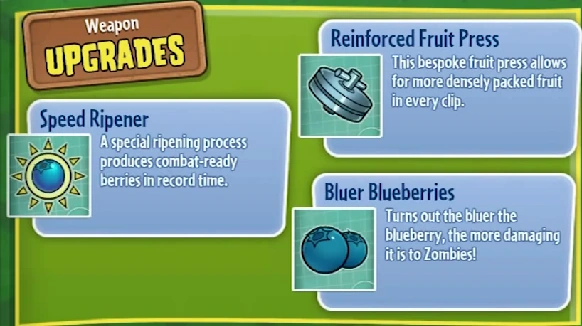
|
125 | Berry Blast | 20-35 (impact/critical damage) 1-15 (splash damage) |
| Plasma Pea | 
|
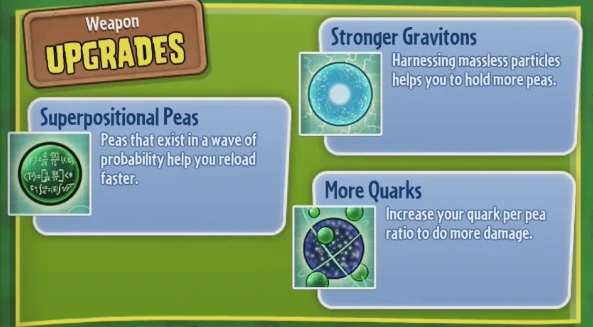
|
125 | Plasmic Disruptor | 20-70 (impact/critical damage, based on charge rate) 10-30 (splash damage, based on charge rate) |
*exact damage varies depending on distance
Sunflower
| Plant | Image | Weapon upgrades | Health | Primary weapon | Primary weapon damage* |
|---|---|---|---|---|---|
| Mystic Flower | 
|
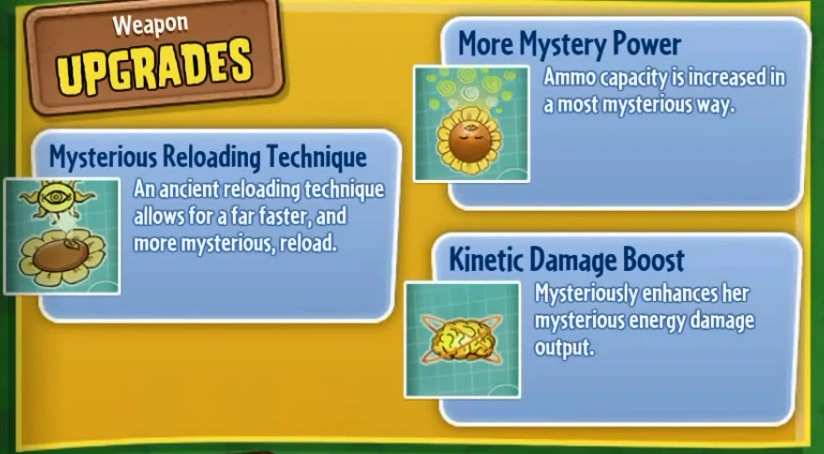
|
100 | Mysterious Energy | 11-40 (impact damage, based on charge rate) 13-80 (critical damage, based on charge rate) |
| Power Flower | 
|
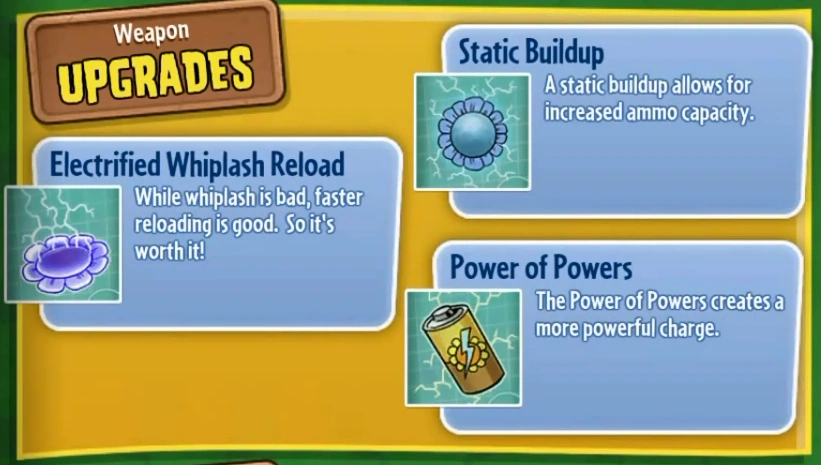
|
100 | Power Pulse | 6-8 (impact damage) 7-9 (critical damage) 5-7 (electric splash) |
| Fire Flower | 
|
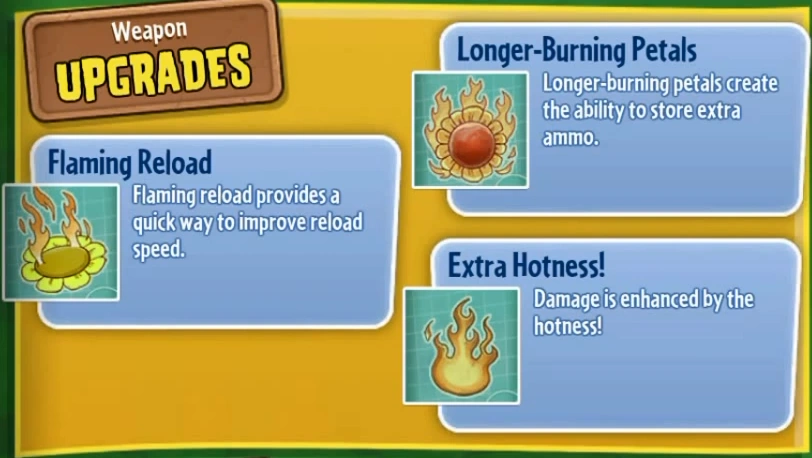
|
100 | Flame Pulse | 4-7 (impact damage) 5-9 (critical damage) 5 (fire damage per second) |
| Shadow Flower | 
|
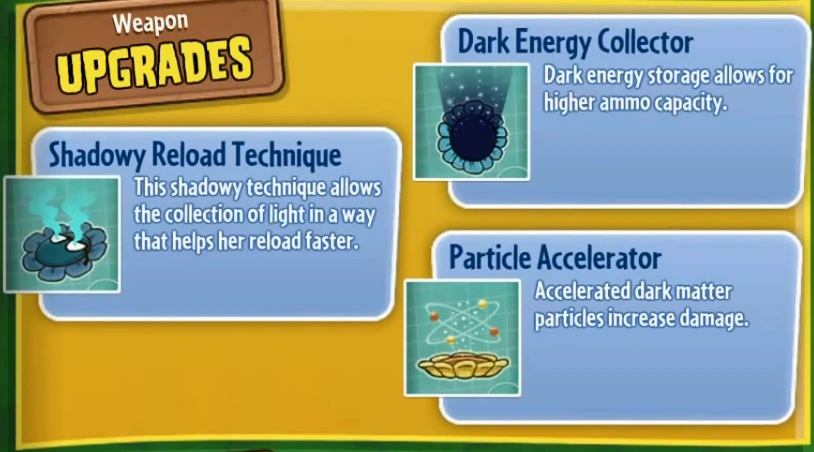
|
100 | Dark Energy | 7-8 (impact damage) 9-10 (critical damage) |
| Metal Petal | 
|
|
150 | Metal Blast | 4-7 (impact damage) 6-9 (critical damage) |
| Sun Pharaoh | 
|

|
100 | Cobra Laser | 10-13 (impact damage) 12-15 (critical damage) |
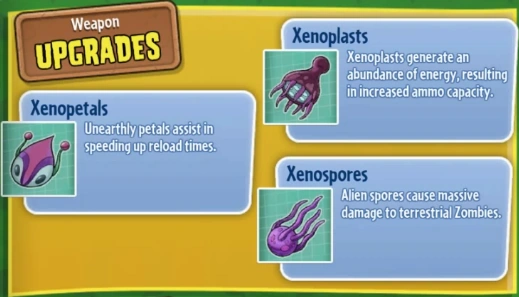
| Alien Flower | 
|
|
100 | Spore Mist | 10-14 (impact damage) 15-18 (critical damage) 3 (spore damage) |
*exact damage varies depending on distance
Chomper
| Plant | Image | Weapon upgrades | Health | Primary weapon | Primary weapon damage |
|---|---|---|---|---|---|
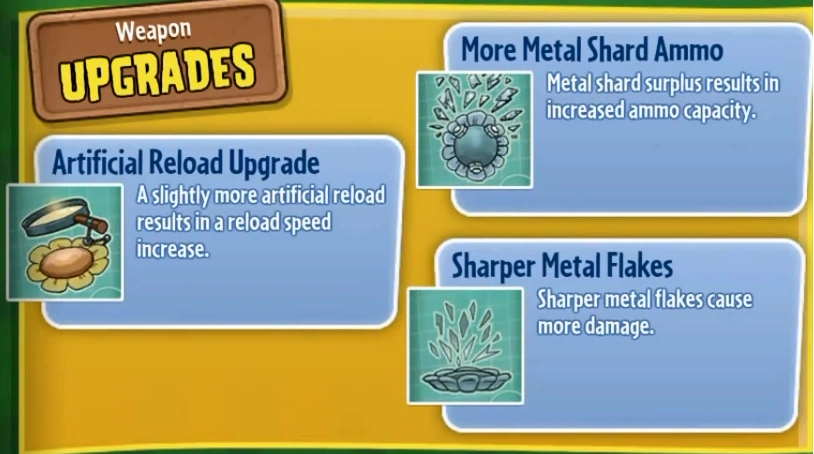
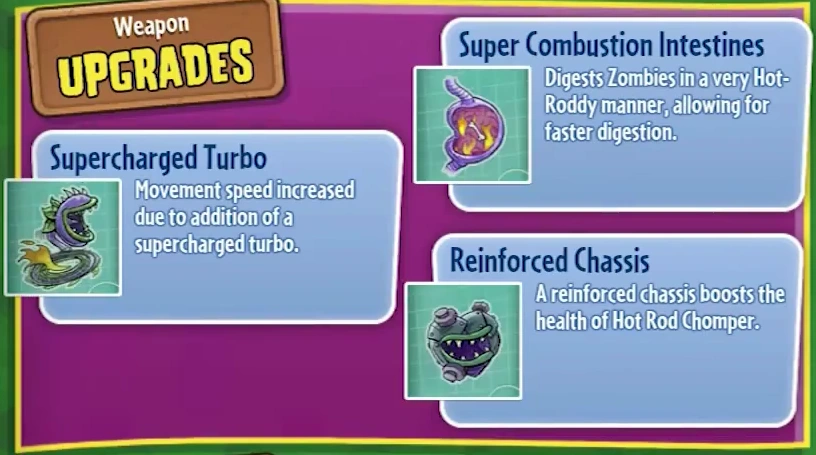
| Hot Rod Chomper | 
|
|
100 125 (upgrade) |
Hot Rod Chomp | 25 (chomp) |
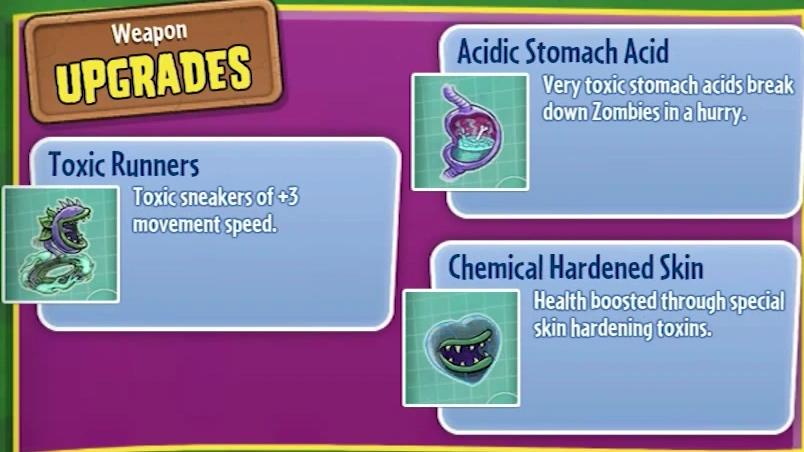
| Toxic Chomper | 
|
|
150 175 (upgrade) |
Toxic Spray | 6-8 (toxic spray) 2-5 (toxic damage per second or being close to enemy) |
| Fire Chomper | 
|
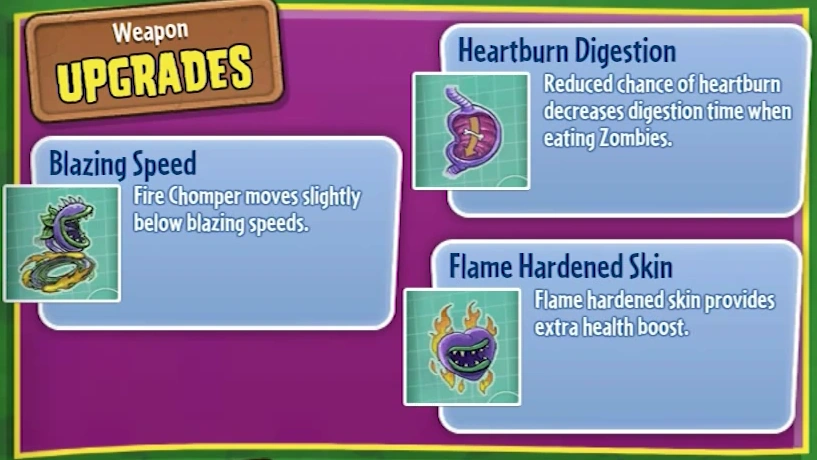
|
150 175 (upgrade) |
Flame Spray | 8-10 (spray) 5 (fire damage per second) |
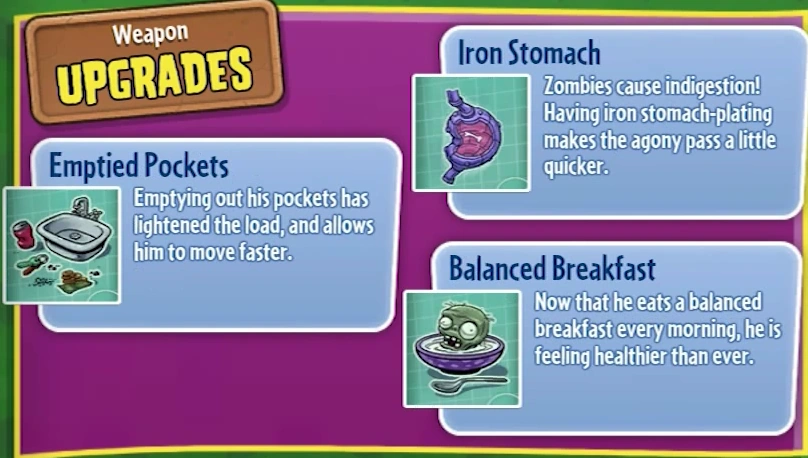
| Power Chomper | 
|

|
150 175 (upgrade) |
Electric Spray | 10 (spray) 2 (splash) |
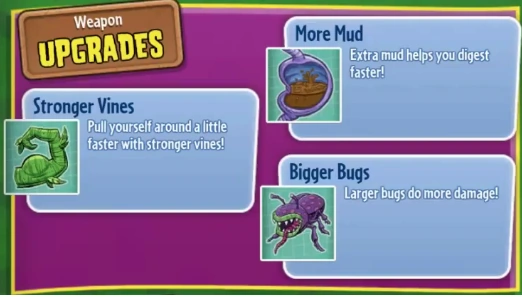
| Count Chompula | 
|

|
125 150 (upgrade) |
Vampiric Chomp | 25 |
| Armor Chomper | 
|
|
200 225 (upgrade) |
Metal Chomp | 50-60 |
| Chester Chomper | 
|
|
125 150 (upgrade) |
Cheesy Chomp | 25 |
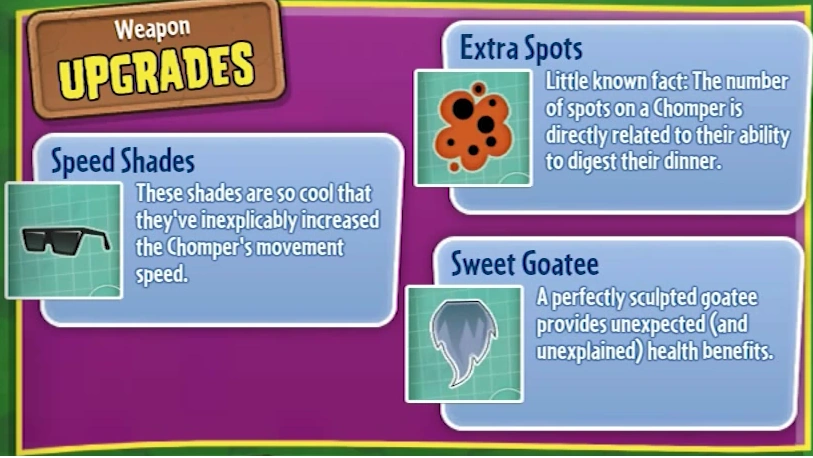
| Chomp Thing | 
|
|
100 125 (upgrade) |
Swamp Spray | 5-12 |
Cactus
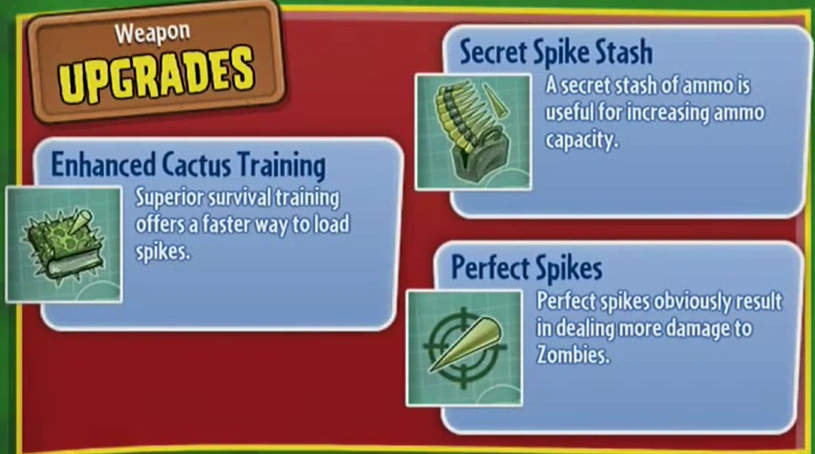
| Plant | Image | Weapon upgrades | Health | Primary weapon | Primary weapon damage* |
|---|---|---|---|---|---|
| Camo Cactus | 
|
|
125 | Camo Shot | 30-33 (impact damage) 60-66 (critical damage) |
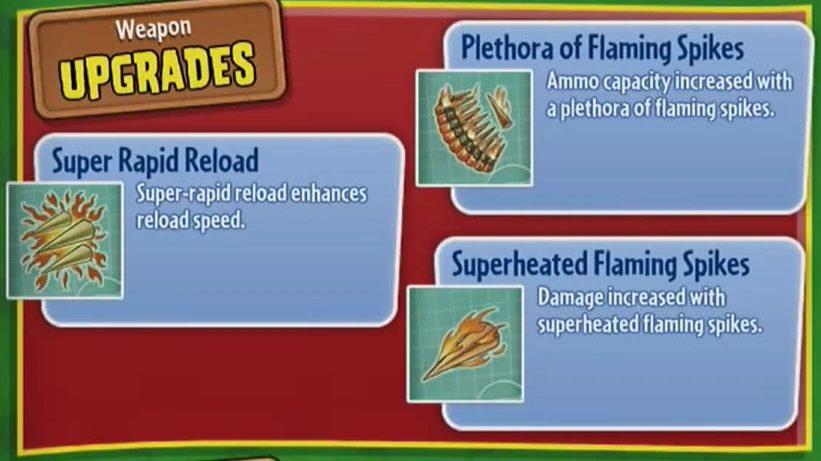
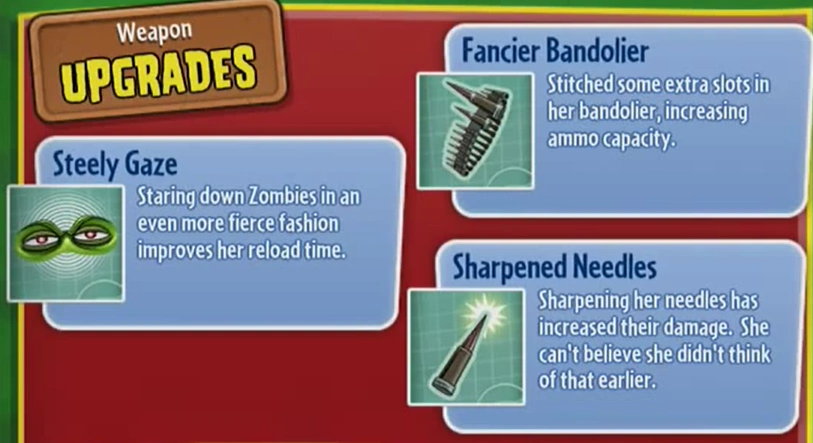
| Fire Cactus | 
|
|
125 | Fire Needle | 16-22 (impact damage) 23-30 (critical damage) 5 (fire damage per second) |
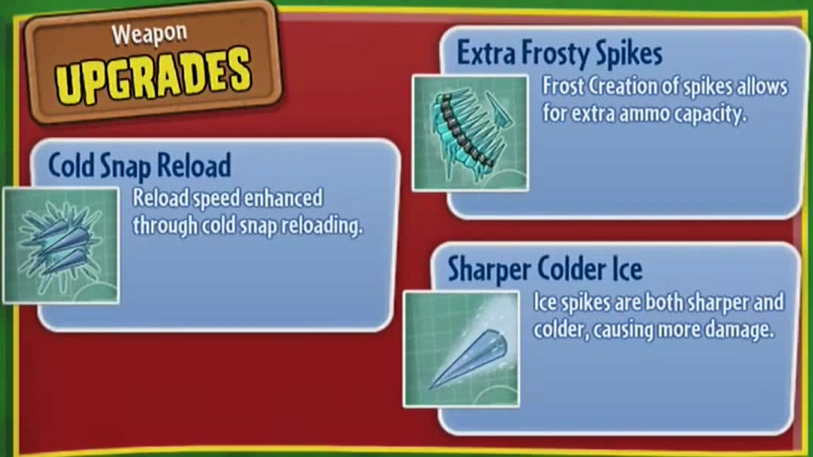
| Ice Cactus | 
|
|
125 | Ice Needle | 15-22 (impact damage) 16-26 (critical damage) |
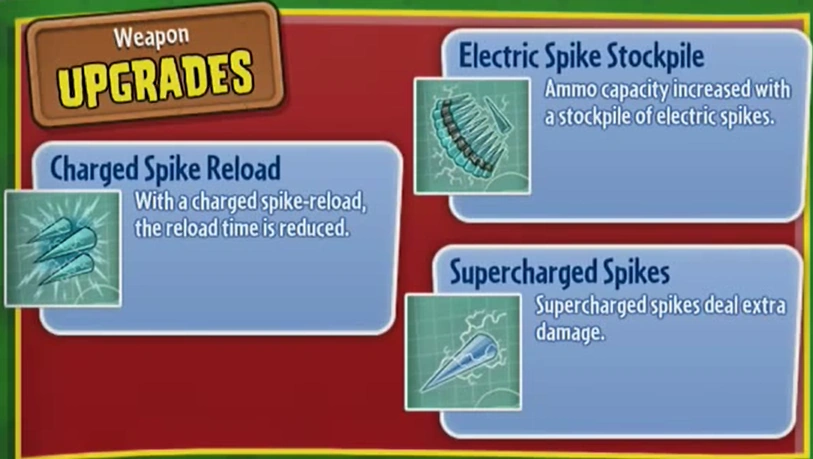
| Power Cactus | 
|
|
125 | Electric Needle | 15-22 (impact damage) 18-27 (critical damage) 3-7 (electric splash) |
| Future Cactus | 
|
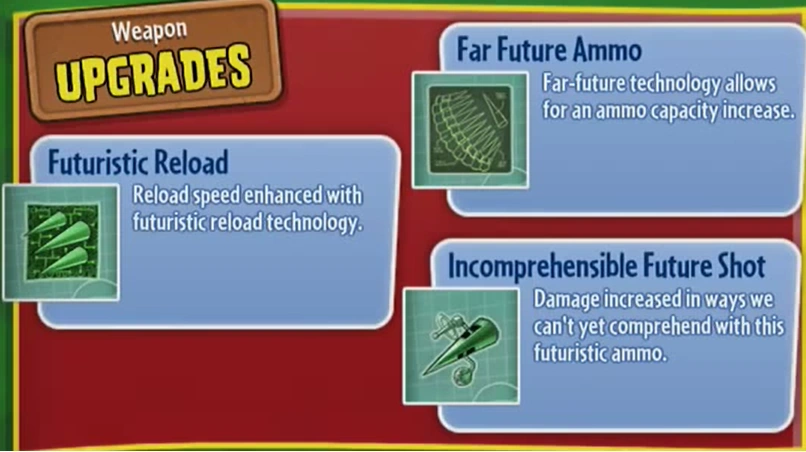
|
125 | Future Shot | 10-94 (impact damage) 20-107 (critical damage) 30 (splash damage, fully charged projectile only) |
| Bandit Cactus | 
|
|
125 | Gatling Needle | 9 (impact damage) 10-11 (critical damage) |
| Citrus Cactus | 
|
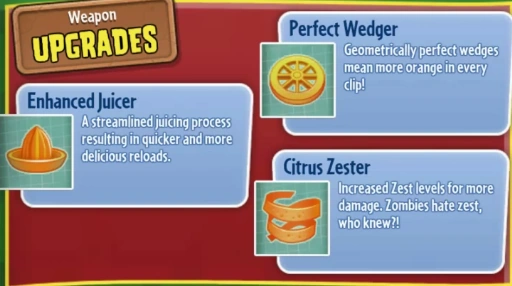
|
125 | Orange Burst | 13-17 (impact/critical damage) 5-15 (splash damage) |
| Jade Cactus |  ] ]
|
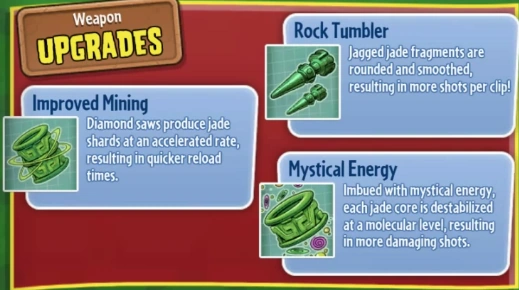
|
150 | Shatter Shot | 11-26 (impact damage) 13-38 (critical damage, based on distance) 15 (splash damage) |
*exact damage varies depending on distance
Ability plants
These plants are the abilities of each playable character.
| Plant | Image | Ability for |
|---|---|---|
| Chili Bean Bomb | 
|
Peashooter |
| Sombrero Bean Bomb | 
|
Peashooter |
| Heal Flower | 
|
Sunflower |
| Dark Flower | 
|
Sunflower |
| Spikeweed | 
|
Chomper |
| Spiky Spikeweed | 
|
Chomper |
| Chesterweed | 
|
Chomper |
| Potato Mine | 
|
Cactus |
| Garlic Drone | 
|
Cactus |
| Tallnut Battlement | 
|
Cactus |
| Potato Nugget Mine | 
|
Cactus |
| Artichoke Drone | 
|
Cactus |
| Iron Maiden | 
|
Cactus |
| Coconut Spotting Station | 
|
Crazy Dave |
| Twin Heal Flower | 
|
Crazy Dave |
| Cherry Strike | 
|
Crazy Dave |
| Revive Rainbow | 
|
Crazy Dave |
Spawnable Plants
Spawnable Plants (sometimes referred to as Potted Plants) are a type of NPC plants that can be planted by the player.
There are 15 Spawnable Plants that can be used as well as 4 limited edition holiday Spawnable Plants. They can only be planted in empty flower pots. The Spawnable Plants are used as assistance to fight off the zombie hordes. Each are considered consumables that once planted can not be picked back up. They are only usable in Gardens & Graveyards, Garden Ops and Taco Bandits. Spawnable Plants can only be obtained by purchasing sticker packs with in-game coins.
| Plant | Image | Health |
|---|---|---|
| Pea Cannon | 
|
36 (approx.) |
| Pea Repeater | 
|
80 (approx.) |
| Gatling Pea | 
|
100 (approx.) |
| Bonk Choy | 
|
100 (approx.) |
| Scaredy-shroom | 
|
70 (approx.) |
| Heal Flower | 
|
61 (approx.) |
| Fume-shroom | 
|
75 (approx.) |
| Goop-shroom | 
|
100 (approx.) |
| Snap Dragon | 
|
95 (approx.) |
| Ice-shroom | 
|
50 (approx.) |
| Doom-shroom | 
|
100 (approx.) |
| Ice Peashooter | 
|
42 (approx.) |
| Fire Peashooter | 
|
70 (approx.) |
| Bamboo Shoot | 
|
50 (approx.) |
| Laser Bean | 
|
100 (approx.) |
Other plants
These plants are not playable or spawnable but appear in some maps either as a part of the environment or as interactive objects.
| Plant | Image |
|---|---|
| Tallnut Cannon | File:Cnc.png |
| Tallnut | 
|
| Corn Mortar | 
|
| Tactical Cuke | 
|
| Flax Cannon | 
|
| Mega Flower | 
|
See also
| V · E |
| Plants vs. Zombies: Garden Warfare 2 plants | |||||||||||||||||||||||
|---|---|---|---|---|---|---|---|---|---|---|---|---|---|---|---|---|---|---|---|---|---|---|---|
| Playable Classes |
| ||||||||||||||||||||||
| Abilities |
| ||||||||||||||||||||||
| Spawnable Plants |
| ||||||||||||||||||||||
| Bosses | Giga Torchwood · Super Bean · Sunflower Queen · Big Stump · Marigold · Squash · Royal Hypno-Flower · Spooky Squash | ||||||||||||||||||||||
| L.E.A.F. | Agent Citron · Agent Rose · Agent Corn · Grumpy Stumpy · Ironball | ||||||||||||||||||||||
| Others | Assistant Manager Bitey · Crystal Guardian · Tallnut · Tallnut Cannon | ||||||||||||||||||||||
| Plants vs. Zombies: Battle for Neighborville plants | |||||||||||||||||||||||||||||||
|---|---|---|---|---|---|---|---|---|---|---|---|---|---|---|---|---|---|---|---|---|---|---|---|---|---|---|---|---|---|---|---|
| Playable Classes |
| ||||||||||||||||||||||||||||||
| Abilities |
| ||||||||||||||||||||||||||||||
| Spawnable Plants |
| ||||||||||||||||||||||||||||||
| Battle Leaders | Bam-Bam-Boo · Bluehorn Corn · Flotsamuel · Lucy · No-Neck Raffi · Pinky Rain · Pollen Kate · Pound Cake · Queen Capra · Sherman · Sproutrage · Teddy | ||||||||||||||||||||||||||||||
| Bounty Hunt |
| ||||||||||||||||||||||||||||||
| Elusive Foes |
| ||||||||||||||||||||||||||||||
| Bosses | Dreadroot · Giga Torchwood · Sunflower Queen · Super Bean · Marigold · Hypno Sunflower Queen · Spooky Squash · Bitter Dill · Dreadwood · Blight Cap | ||||||||||||||||||||||||||||||
| Quest NPCs | Air Ron · Best Fishing Friend™️ · Bingo-Bongo · Brian · Corny Corn · Dandelion · Exposition Al · Gilly the Kid · Harmela · Land Phil · Major Sweetie · Mark · Mike · Sergeant Peel · Sir Crustworthy · Sir Victor-Ian · Tenderleaf · Tumbleweed Ted · Vivian | ||||||||||||||||||||||||||||||
| Others | Weed · Pumpkin Weed · Leaf Shield Weed · Pumpkin Wildflower · Mindblower | ||||||||||||||||||||||||||||||