mNo edit summary |
No edit summary Tag: Visual edit |
||
| (15 intermediate revisions by 12 users not shown) | |||
| Line 1: | Line 1: | ||
| − | |||
:''For the Chinese version of the level, see [[Big Wave Beach - Day 30 (Chinese version)]].'' |
:''For the Chinese version of the level, see [[Big Wave Beach - Day 30 (Chinese version)]].'' |
||
| − | |||
{{Infobox level |
{{Infobox level |
||
| − | |image = |
+ | |image = BWBDAY30.png |
|Game = Plants vs. Zombies 2 |
|Game = Plants vs. Zombies 2 |
||
|Loc = Big Wave Beach |
|Loc = Big Wave Beach |
||
| Line 9: | Line 7: | ||
|EM = Third column |
|EM = Third column |
||
|Flag = Four |
|Flag = Four |
||
| − | |Diff = Extremely hard |
||
|Plant = Choice<br>'''Endangered plants:'''<br>Five {{S|Guacodile|2}} |
|Plant = Choice<br>'''Endangered plants:'''<br>Five {{S|Guacodile|2}} |
||
| − | |FR = A [[ |
+ | |FR = A [[Piñata|Big Wave Beach piñata]] |
|NR = A [[money bag]] |
|NR = A [[money bag]] |
||
|Objective 1 = Survive and protect the endangered plants |
|Objective 1 = Survive and protect the endangered plants |
||
| Line 17: | Line 14: | ||
|before = Big Wave Beach - Day 29 |
|before = Big Wave Beach - Day 29 |
||
|after = Big Wave Beach - Day 31}} |
|after = Big Wave Beach - Day 31}} |
||
| − | {{Levelintro2|no=thirtieth|area=Big Wave Beach|type=[[Save Our Seeds]]|To complete this level, the player must protect the five [[Guacodile]]s which are located in the first column. The tideline is located between the second and third column.|unique=gets a [[ |
+ | {{Levelintro2|no=thirtieth|area=Big Wave Beach|type=[[Save Our Seeds]]|To complete this level, the player must protect the five [[Guacodile]]s which are located in the first column. The tideline is located between the second and third column.|unique=gets a [[Piñata|Big Wave Beach piñata]]}} |
==Difficulty== |
==Difficulty== |
||
| + | *Since the zombies are no match for a usual shooter; Endangered Guacodile with rush the early waves thus making it harder to prepare sun. |
||
*If a [[Fisherman Zombie]] hooks a Guacodile, he will make it perform its rush attack which makes it go off-screen, therefore losing the level. The player needs to plant either many plants or feed [[Plant Food]] to an Infi-nut to win this level easily. |
*If a [[Fisherman Zombie]] hooks a Guacodile, he will make it perform its rush attack which makes it go off-screen, therefore losing the level. The player needs to plant either many plants or feed [[Plant Food]] to an Infi-nut to win this level easily. |
||
*Zombies will enter the lawn early in this level; however, slower in the middle waves. |
*Zombies will enter the lawn early in this level; however, slower in the middle waves. |
||
| Line 26: | Line 24: | ||
==Waves== |
==Waves== |
||
{{Waves |
{{Waves |
||
| + | |world = Big Wave Beach |
||
|zombie1 = {{S|Imp Mermaid Zombie|2}} {{S|Imp Mermaid Zombie|2}} |
|zombie1 = {{S|Imp Mermaid Zombie|2}} {{S|Imp Mermaid Zombie|2}} |
||
|zombie2 = {{S|Pompadour Zombie|2}} {{S|Bikini Zombie|2}} {{S|Imp Mermaid Zombie|2}} |
|zombie2 = {{S|Pompadour Zombie|2}} {{S|Bikini Zombie|2}} {{S|Imp Mermaid Zombie|2}} |
||
| − | |note2 = |
+ | |note2 = Carries 1x [[Plant Food]]. |
|zombie3 = {{S|Pompadour Zombie|2}} {{S|Pompadour Zombie|2}} {{S|Bikini Zombie|2}} {{S|Bikini Conehead|2}} |
|zombie3 = {{S|Pompadour Zombie|2}} {{S|Pompadour Zombie|2}} {{S|Bikini Zombie|2}} {{S|Bikini Conehead|2}} |
||
|zombie4 = {{S|Bikini Zombie|2}} |
|zombie4 = {{S|Bikini Zombie|2}} |
||
| − | |note4 = |
+ | |note4 = Low Tide! |
|ambush4 = {{S|Pompadour Zombie|2}} {{S|Pompadour Zombie|2}} {{S|Pompadour Zombie|2}} {{S|Bikini Zombie|2}} {{S|Bikini Zombie|2}} {{S|Bikini Zombie|2}} {{S|Imp Mermaid Zombie|2}} {{S|Imp Mermaid Zombie|2}} {{S|Imp Mermaid Zombie|2}} |
|ambush4 = {{S|Pompadour Zombie|2}} {{S|Pompadour Zombie|2}} {{S|Pompadour Zombie|2}} {{S|Bikini Zombie|2}} {{S|Bikini Zombie|2}} {{S|Bikini Zombie|2}} {{S|Imp Mermaid Zombie|2}} {{S|Imp Mermaid Zombie|2}} {{S|Imp Mermaid Zombie|2}} |
||
| − | |zombie5 = {{S|Pompadour Conehead|2}}<sup>1</sup> {{S|Pompadour Conehead|2}}<sup>3</sup> {{S|Pompadour Conehead|2}}<sup>5</sup> {{S| |
+ | |zombie5 = {{S|Pompadour Conehead|2}}<sup>1</sup> {{S|Pompadour Conehead|2}}<sup>3</sup> {{S|Pompadour Conehead|2}}<sup>5</sup> {{S|Beach Flag Zombie|2}} {{S|Bikini Conehead|2}}<sup>2</sup> {{S|Fisherman Zombie|2}} |
| − | |note5 = First flag |
+ | |note5 = First flag. |
|zombie6 = {{S|Pompadour Buckethead|2}} {{S|Bikini Buckethead|2}} |
|zombie6 = {{S|Pompadour Buckethead|2}} {{S|Bikini Buckethead|2}} |
||
|zombie7 = {{S|Pompadour Buckethead|2}} {{S|Snorkel Zombie|2}}<sup>5</sup> {{S|Snorkel Zombie|2}} |
|zombie7 = {{S|Pompadour Buckethead|2}} {{S|Snorkel Zombie|2}}<sup>5</sup> {{S|Snorkel Zombie|2}} |
||
| − | |note7 = Water reaches 6th column |
||
|zombie8 = {{S|Snorkel Zombie|2}}<sup>1</sup> {{S|Snorkel Zombie|2}}<sup>2</sup> {{S|Fisherman Zombie|2}}<sup>5</sup> |
|zombie8 = {{S|Snorkel Zombie|2}}<sup>1</sup> {{S|Snorkel Zombie|2}}<sup>2</sup> {{S|Fisherman Zombie|2}}<sup>5</sup> |
||
| − | |note8 = |
+ | |note8 = Carries 1x Plant Food. |
|zombie9 = {{S|Snorkel Zombie|2}}<sup>3</sup> {{S|Snorkel Zombie|2}}<sup>4</sup> {{S|Surfer Zombie|2}}<sup>2</sup> |
|zombie9 = {{S|Snorkel Zombie|2}}<sup>3</sup> {{S|Snorkel Zombie|2}}<sup>4</sup> {{S|Surfer Zombie|2}}<sup>2</sup> |
||
| − | |note9 = Water reaches 4th column |
||
|zombie10 = {{S|Beach Flag Zombie|2}} {{S|Fisherman Zombie|2}} |
|zombie10 = {{S|Beach Flag Zombie|2}} {{S|Fisherman Zombie|2}} |
||
| − | |note10 = Second flag |
+ | |note10 = Second flag.<br>Low Tide! |
|ambush10 = {{S|Surfer Zombie|2}} {{S|Surfer Zombie|2}} {{S|Surfer Zombie|2}} {{S|Imp Mermaid Zombie|2}} {{S|Imp Mermaid Zombie|2}} {{S|Imp Mermaid Zombie|2}} {{S|Imp Mermaid Zombie|2}} {{S|Imp Mermaid Zombie|2}} {{S|Imp Mermaid Zombie|2}} {{S|Octo Zombie|2}} |
|ambush10 = {{S|Surfer Zombie|2}} {{S|Surfer Zombie|2}} {{S|Surfer Zombie|2}} {{S|Imp Mermaid Zombie|2}} {{S|Imp Mermaid Zombie|2}} {{S|Imp Mermaid Zombie|2}} {{S|Imp Mermaid Zombie|2}} {{S|Imp Mermaid Zombie|2}} {{S|Imp Mermaid Zombie|2}} {{S|Octo Zombie|2}} |
||
|zombie11 = {{S|Surfer Zombie|2}}<sup>3</sup> {{S|Surfer Zombie|2}}<sup>4</sup> |
|zombie11 = {{S|Surfer Zombie|2}}<sup>3</sup> {{S|Surfer Zombie|2}}<sup>4</sup> |
||
| − | |note11 = Water reaches 5th column |
||
|zombie12 = {{S|Surfer Zombie|2}}<sup>1</sup> {{S|Surfer Zombie|2}}<sup>5</sup> |
|zombie12 = {{S|Surfer Zombie|2}}<sup>1</sup> {{S|Surfer Zombie|2}}<sup>5</sup> |
||
| − | |note12 = Water reaches 3rd column |
||
|zombie13 = {{S|Fisherman Zombie|2}} |
|zombie13 = {{S|Fisherman Zombie|2}} |
||
| − | |note13 = |
+ | |note13 = Low Tide! |
|ambush13 = {{S|Deep Sea Gargantuar|2}} {{S|Imp Mermaid Zombie|2}} {{S|Imp Mermaid Zombie|2}} {{S|Imp Mermaid Zombie|2}} {{S|Imp Mermaid Zombie|2}} {{S|Imp Mermaid Zombie|2}} {{S|Imp Mermaid Zombie|2}} |
|ambush13 = {{S|Deep Sea Gargantuar|2}} {{S|Imp Mermaid Zombie|2}} {{S|Imp Mermaid Zombie|2}} {{S|Imp Mermaid Zombie|2}} {{S|Imp Mermaid Zombie|2}} {{S|Imp Mermaid Zombie|2}} {{S|Imp Mermaid Zombie|2}} |
||
|zombie14 = {{S|Pompadour Zombie|2}} {{S|Pompadour Zombie|2}} {{S|Pompadour Zombie|2}} {{S|Pompadour Conehead|2}}<sup>2</sup> {{S|Pompadour Buckethead|2}}<sup>2</sup> {{S|Pompadour Buckethead|2}} {{S|Bikini Zombie|2}}<sup>2</sup> {{S|Bikini Zombie|2}} {{S|Bikini Conehead|2}} |
|zombie14 = {{S|Pompadour Zombie|2}} {{S|Pompadour Zombie|2}} {{S|Pompadour Zombie|2}} {{S|Pompadour Conehead|2}}<sup>2</sup> {{S|Pompadour Buckethead|2}}<sup>2</sup> {{S|Pompadour Buckethead|2}} {{S|Bikini Zombie|2}}<sup>2</sup> {{S|Bikini Zombie|2}} {{S|Bikini Conehead|2}} |
||
| − | |note14 = |
+ | |note14 = Carries 1x Plant Food. |
|zombie15 = {{S|Beach Flag Zombie|2}} {{S|Fisherman Zombie|2}}<sup>1</sup> {{S|Fisherman Zombie|2}}<sup>2</sup> {{S|Fisherman Zombie|2}}<sup>3</sup> {{S|Fisherman Zombie|2}}<sup>4</sup> {{S|Fisherman Zombie|2}}<sup>5</sup> |
|zombie15 = {{S|Beach Flag Zombie|2}} {{S|Fisherman Zombie|2}}<sup>1</sup> {{S|Fisherman Zombie|2}}<sup>2</sup> {{S|Fisherman Zombie|2}}<sup>3</sup> {{S|Fisherman Zombie|2}}<sup>4</sup> {{S|Fisherman Zombie|2}}<sup>5</sup> |
||
| − | |note15 = Third flag |
+ | |note15 = Third flag. |
|zombie16 = {{S|Pompadour Buckethead|2}}<sup>3</sup> {{S|Bikini Conehead|2}}<sup>3</sup> {{S|Bikini Buckethead|2}} {{S|Bikini Buckethead|2}} {{S|Surfer Zombie|2}} |
|zombie16 = {{S|Pompadour Buckethead|2}}<sup>3</sup> {{S|Bikini Conehead|2}}<sup>3</sup> {{S|Bikini Buckethead|2}} {{S|Bikini Buckethead|2}} {{S|Surfer Zombie|2}} |
||
| − | |note16 = Water reaches 6th column |
||
|zombie17 = {{S|Pompadour Conehead|2}}<sup>2</sup> {{S|Pompadour Buckethead|2}}<sup>1</sup> {{S|Pompadour Buckethead|2}}<sup>5</sup> {{S|Bikini Conehead|2}}<sup>4</sup> {{S|Snorkel Zombie|2}} {{S|Snorkel Zombie|2}} {{S|Imp Mermaid Zombie|2}} |
|zombie17 = {{S|Pompadour Conehead|2}}<sup>2</sup> {{S|Pompadour Buckethead|2}}<sup>1</sup> {{S|Pompadour Buckethead|2}}<sup>5</sup> {{S|Bikini Conehead|2}}<sup>4</sup> {{S|Snorkel Zombie|2}} {{S|Snorkel Zombie|2}} {{S|Imp Mermaid Zombie|2}} |
||
| − | |note17 = Water reaches 5th column |
||
|zombie18 = {{S|Surfer Zombie|2}} {{S|Surfer Zombie|2}} {{S|Octo Zombie|2}}<sup>3</sup> |
|zombie18 = {{S|Surfer Zombie|2}} {{S|Surfer Zombie|2}} {{S|Octo Zombie|2}}<sup>3</sup> |
||
| − | |note18 = Water reaches 2nd column |
||
|zombie19 = {{S|Pompadour Buckethead|2}} {{S|Bikini Zombie|2}} {{S|Bikini Buckethead|2}} {{S|Snorkel Zombie|2}} {{S|Snorkel Zombie|2}} {{S|Snorkel Zombie|2}} {{S|Octo Zombie|2}} |
|zombie19 = {{S|Pompadour Buckethead|2}} {{S|Bikini Zombie|2}} {{S|Bikini Buckethead|2}} {{S|Snorkel Zombie|2}} {{S|Snorkel Zombie|2}} {{S|Snorkel Zombie|2}} {{S|Octo Zombie|2}} |
||
| − | |note19 = |
+ | |note19 = Carries 1x Plant Food. |
| − | |zombie20 = {{S|Pompadour Buckethead|2}}<sup>2</sup> {{S|Pompadour Buckethead|2}}<sup>4</sup> {{S|Bikini Conehead|2}} {{S|Bikini Buckethead|2}}<sup>3</sup> |
+ | |zombie20 = {{S|Pompadour Buckethead|2}}<sup>2</sup> {{S|Pompadour Buckethead|2}}<sup>4</sup> {{S|Beach Flag Zombie|2}} {{S|Bikini Conehead|2}} {{S|Bikini Buckethead|2}}<sup>3</sup> {{S|Snorkel Zombie|2}} {{S|Surfer Zombie|2}}<sup>1</sup> {{S|Surfer Zombie|2}}<sup>5</sup> {{S|Deep Sea Gargantuar|2}}<sup>5</sup> {{S|Fisherman Zombie|2}} |
| − | |note20 = Final |
+ | |note20 = Final wave. |
| + | |special1 = <div align="center">7</div> |
||
| + | |special2 = <div align="center">7</div> |
||
| + | |special3 = <div align="center">7</div> |
||
| + | |special4 = <div align="center">1</div> |
||
| + | |special5 = <div align="center">1</div> |
||
| + | |special6 = <div align="center">1</div> |
||
| + | |special7 = <div align="center">3</div> |
||
| + | |special8 = <div align="center">6</div> |
||
| + | |special9 = <div align="center">5</div> |
||
| + | |special10 = <div align="center">4</div> |
||
| + | |special11 = <div align="center">6</div> |
||
| + | |special12 = <div align="center">6</div> |
||
| + | |special13 = <div align="center">1</div> |
||
| + | |special14 = <div align="center">1</div> |
||
| + | |special15 = <div align="center">1</div> |
||
| + | |special16 = <div align="center">6</div> |
||
| + | |special17 = <div align="center">4</div> |
||
| + | |special18 = <div align="center">7</div> |
||
| + | |special19 = <div align="center">5</div> |
||
| + | |special20 = <div align="center">5</div>}} |
||
==Strategies== |
==Strategies== |
||
| − | ===Strategy 1 |
+ | ===Strategy 1=== |
| + | {{GemiumMaybe}} |
||
:''Created by {{U|Uselessguy}}<br />Ask for his permission before editing.<br />See Gallery for more details.'' |
:''Created by {{U|Uselessguy}}<br />Ask for his permission before editing.<br />See Gallery for more details.'' |
||
*'''Required plants:''' |
*'''Required plants:''' |
||
| − | **[[Twin Sunflower |
+ | **[[Twin Sunflower (PvZ2)|Twin Sunflower]] |
| − | **[[Banana Launcher]] |
+ | **[[Banana Launcher]] |
| − | **[[Cherry Bomb |
+ | **[[Cherry Bomb (PvZ2)|Cherry Bomb]] |
| − | **[[Snapdragon]] |
+ | **[[Snapdragon (PvZ2)|Snapdragon]] |
| − | **[[Lily Pad |
+ | **[[Lily Pad (PvZ2)|Lily Pad]] |
| − | **[[Infi-nut]] |
+ | **[[Infi-nut]] (extremely important) |
| − | **[[Tangle Kelp |
+ | **[[Tangle Kelp (PvZ2)|Tangle Kelp]] (or [[Ghost Pepper]]) |
*Keep planting Twin Sunflowers until the ambush comes. Quickly use a Cherry Bomb and plant a Snapdragon to stop the zombies. |
*Keep planting Twin Sunflowers until the ambush comes. Quickly use a Cherry Bomb and plant a Snapdragon to stop the zombies. |
||
*Go on planting Twin Sunflowers. When seeing a [[Fisherman Zombie]], quickly plant an Infi-nut and feed [[Plant Food]] on it. Pay attention to zombies, especially [[Surfer Zombie]]. |
*Go on planting Twin Sunflowers. When seeing a [[Fisherman Zombie]], quickly plant an Infi-nut and feed [[Plant Food]] on it. Pay attention to zombies, especially [[Surfer Zombie]]. |
||
| − | *Plant at least two Snapdragons to protect the Infi-nut's [[force field]]. Plant some Banana Launchers to stop the [[Deep Sea Gargantuar]]s and Surfer Zombies. You need at least four. |
+ | *Plant at least two Snapdragons to protect the Infi-nut's [[force field]]. Plant some Banana Launchers to stop the [[Gargantuar (PvZ2)|Deep Sea Gargantuar]]s and Surfer Zombies. You need at least four. |
*Plant another Infi-nut and feed Plant Food on it. |
*Plant another Infi-nut and feed Plant Food on it. |
||
| − | *When a Deep Sea Gargantuar comes, quickly fire three bananas as fast as you can before it throws its [[Imp Mermaid Zombie]]. It is best not to use [[Turbo Button]]. |
+ | *When a Deep Sea Gargantuar comes, quickly fire three bananas as fast as you can before it throws its [[Imp (PvZ2)|Imp Mermaid Zombie]]. It is best not to use [[Turbo Button]]. |
*Quickly destroy the Surfer Zombies if they are about to kill your Infi-nut, or the Fishermen Zombies will destroy your defense! |
*Quickly destroy the Surfer Zombies if they are about to kill your Infi-nut, or the Fishermen Zombies will destroy your defense! |
||
*Cherry Bombs are very important in this level. Try to use it. |
*Cherry Bombs are very important in this level. Try to use it. |
||
| Line 91: | Line 104: | ||
This strategy allows you to complete the level without Plant Food, paid content, premium plants, or losing [[Lawn Mower|lawn mowers]]. |
This strategy allows you to complete the level without Plant Food, paid content, premium plants, or losing [[Lawn Mower|lawn mowers]]. |
||
*'''Required plants:''' |
*'''Required plants:''' |
||
| − | **[[Twin Sunflower |
+ | **[[Twin Sunflower (PvZ2)|Twin Sunflower]] |
| − | **[[Puff-shroom |
+ | **[[Puff-shroom (PvZ2)|Puff-shroom]] |
| − | **[[Sun-shroom |
+ | **[[Sun-shroom (PvZ2)|Sun-shroom]] |
| − | **[[Cherry Bomb |
+ | **[[Cherry Bomb (PvZ2)|Cherry Bomb]] |
| − | **[[Lily Pad |
+ | **[[Lily Pad (PvZ2)|Lily Pad]] |
| − | **[[Magnifying Grass]] |
+ | **[[Magnifying Grass]] |
| − | **[[Tangle Kelp |
+ | **[[Tangle Kelp (PvZ2)|Tangle Kelp]] |
The goal is to get two columns of Twin Sunflowers up with a column of Magnifying Grass. This will provide enough sun to kill off the enemies. Ideally the Magnifying Grass will go in the fourth column with Twin Sunflowers on either side (the front end providing a buffer). |
The goal is to get two columns of Twin Sunflowers up with a column of Magnifying Grass. This will provide enough sun to kill off the enemies. Ideally the Magnifying Grass will go in the fourth column with Twin Sunflowers on either side (the front end providing a buffer). |
||
| Line 107: | Line 120: | ||
:''By {{U|Mathdude314}}'' |
:''By {{U|Mathdude314}}'' |
||
[[File:BWB30strat.jpg|thumb|160px|The strategy wins!]] |
[[File:BWB30strat.jpg|thumb|160px|The strategy wins!]] |
||
| − | Somewhat similar to |
+ | Somewhat similar to strategy 2 but this one takes advantage of the [[Infi-nut]] in stopping [[Fisherman Zombie]]s. |
*'''Required plants:''' |
*'''Required plants:''' |
||
| − | **[[Twin Sunflower |
+ | **[[Twin Sunflower (PvZ2)|Twin Sunflower]] |
| − | **[[Magnifying Grass]] |
+ | **[[Magnifying Grass]] |
| − | **[[Sun Bean]] |
+ | **[[Sun Bean]] |
| − | **[[Infi-nut]] |
+ | **[[Infi-nut]] |
| − | **[[Lily Pad |
+ | **[[Lily Pad (PvZ2)|Lily Pad]] |
| − | **[[Tangle Kelp |
+ | **[[Tangle Kelp (PvZ2)|Tangle Kelp]] |
| − | **[[Cherry Bomb |
+ | **[[Cherry Bomb (PvZ2)|Cherry Bomb]] or other instant to take out [[Gargantuar (PvZ2)|Gargantuar]]s |
Define the bottom left tile to be (1, 1). Plant Twin Sunflowers on the third column. Dig up the Lily Pads that preexist. Start planting Magnifying Grass on column two. As you progress, build Twin Sunflowers to the fifth column excluding (5, 3). Use Sun Bean to get extra sun. When the Fisherman Zombie comes, plant an Infi-nut at (5, 3) and use [[Plant Food]] on it. You will have 14 Twin Sunflowers at best. Use Cherry Bombs for large groups of zombies or for Gargantuars. |
Define the bottom left tile to be (1, 1). Plant Twin Sunflowers on the third column. Dig up the Lily Pads that preexist. Start planting Magnifying Grass on column two. As you progress, build Twin Sunflowers to the fifth column excluding (5, 3). Use Sun Bean to get extra sun. When the Fisherman Zombie comes, plant an Infi-nut at (5, 3) and use [[Plant Food]] on it. You will have 14 Twin Sunflowers at best. Use Cherry Bombs for large groups of zombies or for Gargantuars. |
||
| Line 123: | Line 136: | ||
:''This does not require premium plants'' |
:''This does not require premium plants'' |
||
*'''Required plants:''' |
*'''Required plants:''' |
||
| − | **[[Primal Sunflower]] |
+ | **[[Primal Sunflower]] |
| − | **[[Primal Wall-nut]] |
+ | **[[Primal Wall-nut]] |
| − | **[[Primal Potato Mine]] |
+ | **[[Primal Potato Mine]] |
| − | **[[Lily Pad |
+ | **[[Lily Pad (PvZ2)|Lily Pad]] |
| − | **[[Tangle Kelp |
+ | **[[Tangle Kelp (PvZ2)|Tangle Kelp]] |
| − | **[[A.K.E.E.]] |
+ | **[[A.K.E.E.]] |
| − | **[[Cherry Bomb |
+ | **[[Cherry Bomb (PvZ2)|Cherry Bomb]] |
*Plant a column of Primal Sunflowers. |
*Plant a column of Primal Sunflowers. |
||
*Plant a few Primal Wall-nuts to prepare for the ambush. |
*Plant a few Primal Wall-nuts to prepare for the ambush. |
||
| Line 135: | Line 148: | ||
*In other rows, plant A.K.E.E. Try to survive without using Plant Food. You can use Cherry Bomb. |
*In other rows, plant A.K.E.E. Try to survive without using Plant Food. You can use Cherry Bomb. |
||
*Reserve for Tangle Kelp to kill [[Fisherman Zombie]], try to kill it as soon as it appears (single). |
*Reserve for Tangle Kelp to kill [[Fisherman Zombie]], try to kill it as soon as it appears (single). |
||
| − | *Stall a [[Gargantuar|Deep Sea Gargantuar]] with Primal Wall-nuts, use Primal Potato Mine to kill the others. |
+ | *Stall a [[Gargantuar (PvZ2)|Deep Sea Gargantuar]] with Primal Wall-nuts, use Primal Potato Mine to kill the others. |
*When a group of Fisherman Zombies appear, kill one with Tangle Kelp and others with Cherry Bomb. |
*When a group of Fisherman Zombies appear, kill one with Tangle Kelp and others with Cherry Bomb. |
||
*Use Plant Food on A.K.E.E. to deal with [[Surfer Zombie]] and [[Octo Zombie]]. |
*Use Plant Food on A.K.E.E. to deal with [[Surfer Zombie]] and [[Octo Zombie]]. |
||
| Line 144: | Line 157: | ||
:''This does not require premium plants'' |
:''This does not require premium plants'' |
||
*'''Required plants:''' |
*'''Required plants:''' |
||
| − | **[[Lily Pad |
+ | **[[Lily Pad (PvZ2)|Lily Pad]] |
| − | **[[Infi-nut]] |
+ | **[[Infi-nut]] |
| − | **[[Sun-shroom |
+ | **[[Sun-shroom (PvZ2)|Sun-shroom]] |
| − | **[[Snapdragon]] |
+ | **[[Snapdragon (PvZ2)|Snapdragon]] |
| − | **[[Tangle Kelp |
+ | **[[Tangle Kelp (PvZ2)|Tangle Kelp]] |
| − | **[[Cherry Bomb |
+ | **[[Cherry Bomb (PvZ2)|Cherry Bomb]] |
**Any other plant you need. |
**Any other plant you need. |
||
| Line 172: | Line 185: | ||
**Surfer Zombie's ability is very dangerous. If you get the chance, try to kill it while it is still surfing so it does not carry its surfboard on shore. Use Cherry Bomb to kill them when they are in Low Tide and shoot it with Magnifying Grass if that is not available. |
**Surfer Zombie's ability is very dangerous. If you get the chance, try to kill it while it is still surfing so it does not carry its surfboard on shore. Use Cherry Bomb to kill them when they are in Low Tide and shoot it with Magnifying Grass if that is not available. |
||
**Octo Zombies do not appear very often in this level. Use Ghost Pepper to kill this zombie while using Magnifying Grass to free plants from its octopi. |
**Octo Zombies do not appear very often in this level. Use Ghost Pepper to kill this zombie while using Magnifying Grass to free plants from its octopi. |
||
| − | **Fisherman Zombies have an annoying ability but |
+ | **Fisherman Zombies have an annoying ability but they are easy to defeat. Shoot them to death with Magnifying Grass on sight. Alternatively, you can use Ghost Pepper to deal with them. |
*'''Procedure''' |
*'''Procedure''' |
||
#Place Gold Bloom to get sun. |
#Place Gold Bloom to get sun. |
||
| Line 187: | Line 200: | ||
#When the final wave comes, use Cherry Bomb to kill as many Fisherman Zombies and Buckethead Zombies. Shoot the Deep Sea Gargantuar with Magnifying Grass as fast as possible before dealing with other threats other than Fisherman Zombies. |
#When the final wave comes, use Cherry Bomb to kill as many Fisherman Zombies and Buckethead Zombies. Shoot the Deep Sea Gargantuar with Magnifying Grass as fast as possible before dealing with other threats other than Fisherman Zombies. |
||
#Shoot the rest of the zombies with Magnifying Grass or kill them with Ghost Pepper. |
#Shoot the rest of the zombies with Magnifying Grass or kill them with Ghost Pepper. |
||
| + | |||
===Strategy 7=== |
===Strategy 7=== |
||
| − | :Created by {{U|Hobo |
+ | :''Created by {{U|Hobo planter}}'' |
:This strategy does not require any premium content. |
:This strategy does not require any premium content. |
||
| − | + | *'''Required plants:''' |
|
**[[Primal Sunflower]] |
**[[Primal Sunflower]] |
||
**[[Rotobaga]] |
**[[Rotobaga]] |
||
**[[Infi-nut]] |
**[[Infi-nut]] |
||
| − | **[[Lily Pad]] |
+ | **[[Lily Pad (PvZ2)|Lily Pad]] |
**[[Primal Potato Mine]] |
**[[Primal Potato Mine]] |
||
| − | **[[Cherry Bomb]] |
+ | **[[Cherry Bomb (PvZ2)|Cherry Bomb]] |
| − | **[[Tangle Kelp]] |
+ | **[[Tangle Kelp (PvZ2)|Tangle Kelp]] |
| − | *'''Execution |
+ | *'''Execution ''' |
| − | *Plant |
+ | *Plant three Primal Sunflowers in the second column. |
| − | *Wait for the Guacodile to |
+ | *Wait for the Guacodile to defeat the first few zombies. |
| − | *Plant |
+ | *Plant one Rotobaga in the third column center row after acquiring a Lily Pad. |
*Complete the Sunflower row with a column filled with Rotobagas. |
*Complete the Sunflower row with a column filled with Rotobagas. |
||
*During the low tide, demolish the zombies with Cherry Bombs and Potato Mines. |
*During the low tide, demolish the zombies with Cherry Bombs and Potato Mines. |
||
| − | *Plant an Infi-nut on the |
+ | *Plant an Infi-nut on the fifth column, give it a Plant Food. |
*Fill all empty tiles behind the shield with Rotobagas. |
*Fill all empty tiles behind the shield with Rotobagas. |
||
| − | *When the Gargantuar appears, |
+ | *When the Gargantuar appears, use mower launch to demolish him. |
*Good luck, fellow planters. |
*Good luck, fellow planters. |
||
| + | |||
===Strategy 8=== |
===Strategy 8=== |
||
| − | Created by 9spaceking |
+ | :''Created by {{U|9spaceking}}'' |
| ⚫ | |||
| ⚫ | |||
| ⚫ | |||
| ⚫ | |||
| ⚫ | |||
| ⚫ | |||
| ⚫ | |||
| + | **[[Cherry Bomb (PvZ2)|Cherry Bomb]] |
||
| + | **[[Lily Pad (PvZ2)|Lily Pad]] |
||
| ⚫ | |||
| ⚫ | |||
| ⚫ | |||
| ⚫ | |||
| ⚫ | |||
| ⚫ | |||
| ⚫ | |||
| − | *Cherry Bomb |
||
| − | *Lily Pad |
||
| ⚫ | |||
| ⚫ | |||
*Plant Moonflowers on the third column (second, third, and fourth row) with Lily Pads and stall the first zombies with Iceberg Lettuce/Stallia. |
*Plant Moonflowers on the third column (second, third, and fourth row) with Lily Pads and stall the first zombies with Iceberg Lettuce/Stallia. |
||
*Plant Dusk Lobbers on the first column. If zombies threaten to overwhelm, use Grimrose to kill especially tough ones. |
*Plant Dusk Lobbers on the first column. If zombies threaten to overwhelm, use Grimrose to kill especially tough ones. |
||
| Line 243: | Line 258: | ||
IMG_0083.PNG|By {{U|EpicGamer23468}} |
IMG_0083.PNG|By {{U|EpicGamer23468}} |
||
Big Wave Beach - Day 30.PNG|By {{U|VeXJL}} |
Big Wave Beach - Day 30.PNG|By {{U|VeXJL}} |
||
| + | SOBWB30.PNG|By {{U|Someone456}} |
||
| + | Screenshot 2019-07-09-11-51-03.png|Big Wave beach - Day 30, Snapdragon style by [[User:Sir Maxamillian, Legend Hunter|Sir Maxamillian, Legend Hunter]] |
||
| + | Screenshot 2019-09-14 at 1.29.10 AM.png|Completed by Creepes |
||
</gallery> |
</gallery> |
||
| Line 250: | Line 268: | ||
{{Clear}} |
{{Clear}} |
||
{{PvZ2levels}} |
{{PvZ2levels}} |
||
| + | <poll> |
||
| + | How would you rate Big Wave Beach - Day 30's difficulty? |
||
| + | Very hard |
||
| + | Hard |
||
| + | Somewhat hard |
||
| + | Medium |
||
| + | Somewhat easy |
||
| + | Easy |
||
| + | Very easy |
||
| + | </poll> |
||
[[Category:Brain Busters]] |
[[Category:Brain Busters]] |
||
[[Category:Levels with four flags]] |
[[Category:Levels with four flags]] |
||
Latest revision as of 14:38, 4 May 2022
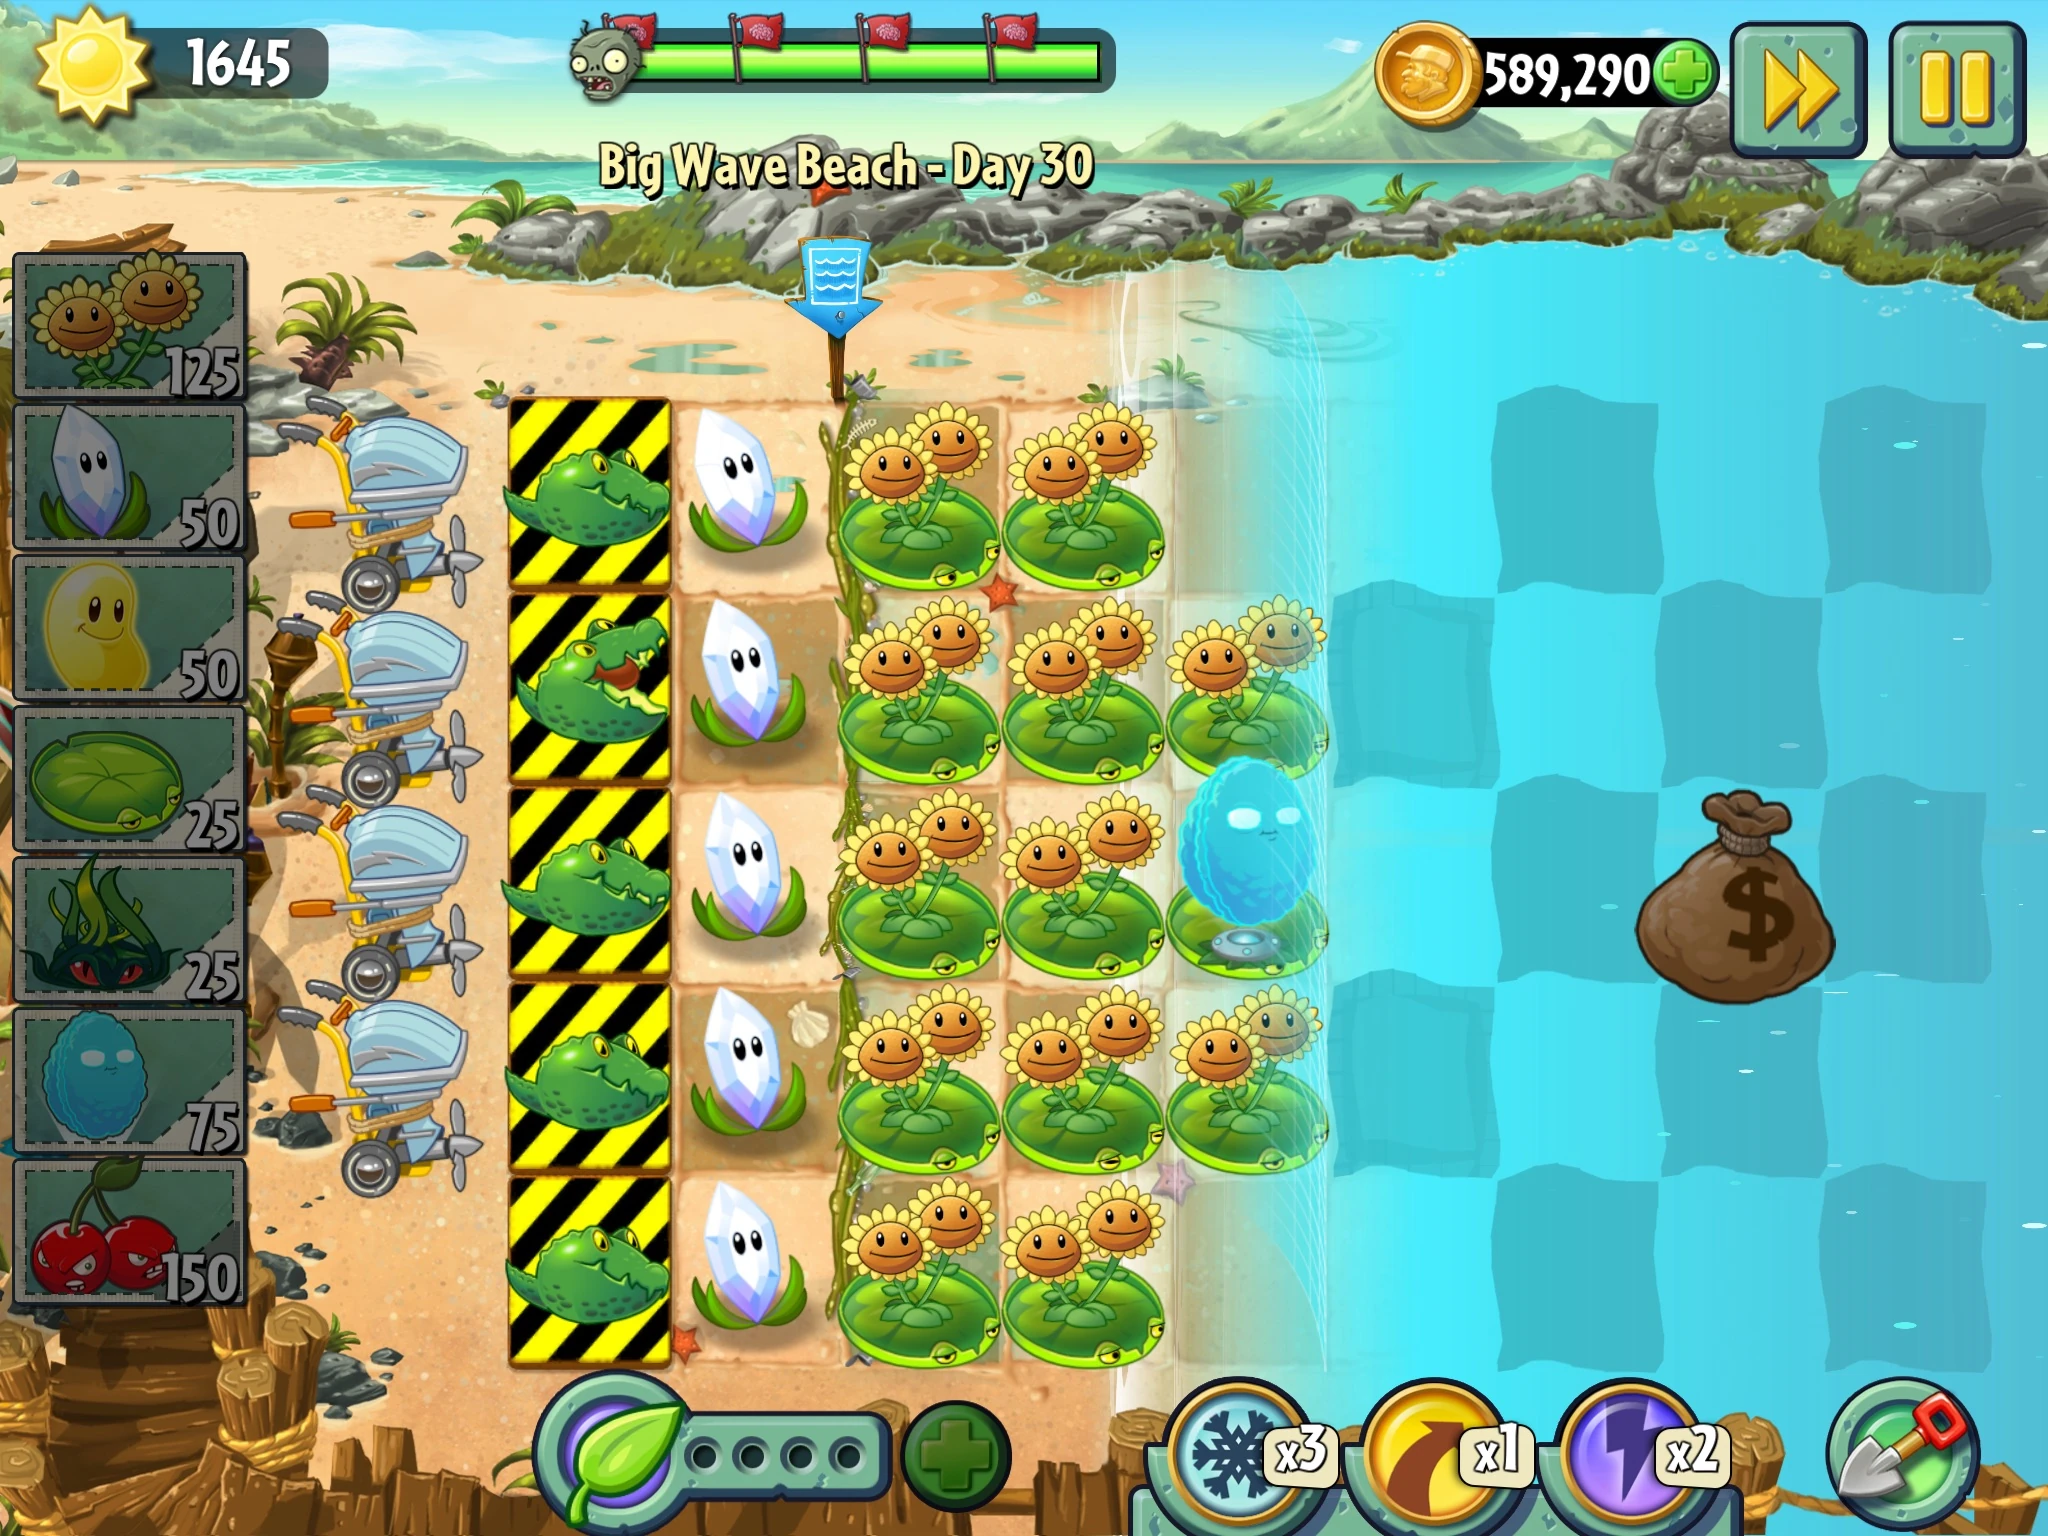
- For the Chinese version of the level, see Big Wave Beach - Day 30 (Chinese version).
Big Wave Beach - Day 30 is the thirtieth level of Big Wave Beach in Plants vs. Zombies 2. It is a Save Our Seeds level. To complete this level, the player must protect the five Guacodiles which are located in the first column. The tideline is located between the second and third column. When this level is finished for the first time, the player gets a Big Wave Beach piñata.
Difficulty
- Since the zombies are no match for a usual shooter; Endangered Guacodile with rush the early waves thus making it harder to prepare sun.
- If a Fisherman Zombie hooks a Guacodile, he will make it perform its rush attack which makes it go off-screen, therefore losing the level. The player needs to plant either many plants or feed Plant Food to an Infi-nut to win this level easily.
- Zombies will enter the lawn early in this level; however, slower in the middle waves.
- Deep Sea Gargantuars will appear during the last ambush.
Waves
- The small number next to the zombie icon means that zombie will always appear in that lane, with 1 being the topmost lane and 5 being the bottommost one.
| Waves | Non-dynamic zombies | Ambush zombies | Tide level | Note(s) |
|---|---|---|---|---|
| 1 | None | 7
|
||
| 2 | None | 7
|
Carries 1x Plant Food. | |
| 3 | None | 7
|
||
| 4 | 1
|
Low Tide! | ||
| 5 | None | 1
|
First flag. | |
| 6 | None | 1
|
||
| 7 | None | 3
|
||
| 8 | None | 6
|
Carries 1x Plant Food. | |
| 9 | None | 5
|
||
| 10 | 4
|
Second flag. Low Tide! | ||
| 11 | None | 6
|
||
| 12 | None | 6
|
||
| 13 | 1
|
Low Tide! | ||
| 14 | None | 1
|
Carries 1x Plant Food. | |
| 15 | None | 1
|
Third flag. | |
| 16 | None | 6
|
||
| 17 | None | 4
|
||
| 18 | None | 7
|
||
| 19 | None | 5
|
Carries 1x Plant Food. | |
| 20 | None | 5
|
Final wave. |
Strategies
Strategy 1
(May contain gem premium content)
- Created by Uselessguy
Ask for his permission before editing.
See Gallery for more details.
- Required plants:
- Twin Sunflower
- Banana Launcher
- Cherry Bomb
- Snapdragon
- Lily Pad
- Infi-nut (extremely important)
- Tangle Kelp (or Ghost Pepper)
- Keep planting Twin Sunflowers until the ambush comes. Quickly use a Cherry Bomb and plant a Snapdragon to stop the zombies.
- Go on planting Twin Sunflowers. When seeing a Fisherman Zombie, quickly plant an Infi-nut and feed Plant Food on it. Pay attention to zombies, especially Surfer Zombie.
- Plant at least two Snapdragons to protect the Infi-nut's force field. Plant some Banana Launchers to stop the Deep Sea Gargantuars and Surfer Zombies. You need at least four.
- Plant another Infi-nut and feed Plant Food on it.
- When a Deep Sea Gargantuar comes, quickly fire three bananas as fast as you can before it throws its Imp Mermaid Zombie. It is best not to use Turbo Button.
- Quickly destroy the Surfer Zombies if they are about to kill your Infi-nut, or the Fishermen Zombies will destroy your defense!
- Cherry Bombs are very important in this level. Try to use it.
Strategy 2
- Created by RaidingParty
This strategy allows you to complete the level without Plant Food, paid content, premium plants, or losing lawn mowers.
- Required plants:
The goal is to get two columns of Twin Sunflowers up with a column of Magnifying Grass. This will provide enough sun to kill off the enemies. Ideally the Magnifying Grass will go in the fourth column with Twin Sunflowers on either side (the front end providing a buffer).
Quickly set up Twin Sunflowers while the first wave approaches while filling the nearby Lily Pads with Puff-shrooms. Kill the first Conehead with a Tangle Kelp just before it gets too close to the halfway area. This will trigger the first Low Tide. Kill off one side of the invading force with a Cherry Bomb and finish off or at least delay the other two rows with Puff-shroom spam until they can be dealt with using Magnifying Grass. Continue filling out your Twin Sunflower and Magnifying Grass columns, and delay on killing the zombies whenever possible.
As Surfers, Octos, and Fishermen appear, shoot them down with Magnifying Grass shots, but note that you can save on sun by using Kelp to kill them, especially the Fishermen/Octos. Plant extra Lily Pads and Sun-shrooms as well, they will provide even more sun, be used as a buffer, and can double as positions for Puff-shrooms. Use Cherry Bombs to counter Low Tide attacks and save on sun. Gargantuars can be killed quickly with Magnifying Grass shots and if they need to be delayed, use Lily Pads, Sun-shrooms, and Puff-shrooms to do so.
Strategy 3
- By Mathdude314
The strategy wins!
Somewhat similar to strategy 2 but this one takes advantage of the Infi-nut in stopping Fisherman Zombies.
- Required plants:
- Twin Sunflower
- Magnifying Grass
- Sun Bean
- Infi-nut
- Lily Pad
- Tangle Kelp
- Cherry Bomb or other instant to take out Gargantuars
Define the bottom left tile to be (1, 1). Plant Twin Sunflowers on the third column. Dig up the Lily Pads that preexist. Start planting Magnifying Grass on column two. As you progress, build Twin Sunflowers to the fifth column excluding (5, 3). Use Sun Bean to get extra sun. When the Fisherman Zombie comes, plant an Infi-nut at (5, 3) and use Plant Food on it. You will have 14 Twin Sunflowers at best. Use Cherry Bombs for large groups of zombies or for Gargantuars.
Strategy 4
- Created by Redhonker
- This does not require premium plants
- Required plants:
- Plant a column of Primal Sunflowers.
- Plant a few Primal Wall-nuts to prepare for the ambush.
- When the low tide comes, immediately plant Primal Potato Mine, pick location to kill the zombies in rows without Primal Wall-nut.
- In other rows, plant A.K.E.E. Try to survive without using Plant Food. You can use Cherry Bomb.
- Reserve for Tangle Kelp to kill Fisherman Zombie, try to kill it as soon as it appears (single).
- Stall a Deep Sea Gargantuar with Primal Wall-nuts, use Primal Potato Mine to kill the others.
- When a group of Fisherman Zombies appear, kill one with Tangle Kelp and others with Cherry Bomb.
- Use Plant Food on A.K.E.E. to deal with Surfer Zombie and Octo Zombie.
- When all fails, launch the lawn mower. (I was able to survive without it most of the time)
Strategy 5
- Created by Tung.jiaxing.5
- This does not require premium plants
- Required plants:
- Lily Pad
- Infi-nut
- Sun-shroom
- Snapdragon
- Tangle Kelp
- Cherry Bomb
- Any other plant you need.
- At the start of the level, fill up the first column with Sun-shrooms.
- When first zombie approaches, plant a Snapdragon on the second column and continue to plant it until it has fully filled up the third column.
- When the low tide comes, immediately plant Cherry Bomb and Infi-nut on center of the third lane with Plant Food.
- Reserve Tangle Kelp to kill Octo Zombies as well as the Fisherman Zombies.
- As for the remaining columns, fill them up with Infi-nut.
- When the Gargantuar appears, use Cherry Bomb to finish it off.
Strategy 6 (Contains gemium content)
- Created by VeXJL
- Required plants:
- Notes
- Deep Sea Gargantuar is not very dangerous. Shoot it to death with Magnifying Grass. Cherry Bomb and Ghost Pepper can save sun.
- Surfer Zombie's ability is very dangerous. If you get the chance, try to kill it while it is still surfing so it does not carry its surfboard on shore. Use Cherry Bomb to kill them when they are in Low Tide and shoot it with Magnifying Grass if that is not available.
- Octo Zombies do not appear very often in this level. Use Ghost Pepper to kill this zombie while using Magnifying Grass to free plants from its octopi.
- Fisherman Zombies have an annoying ability but they are easy to defeat. Shoot them to death with Magnifying Grass on sight. Alternatively, you can use Ghost Pepper to deal with them.
- Procedure
- Place Gold Bloom to get sun.
- Place Twin Sunflower in the second column.
- Place Lily Pad and Magnifying Grass in the third column.
- Kill the first few zombies with Guacodile/Magnifying Grass.
- Use Plant Food on Gold Bloom when you get it.
- Place the Rotobagas on the fourth column. This should distract Octo Zombies and Fisherman Zombies.
- When the first Low Tide comes, plant Cherry Bomb where it could kill the most Surfer Zombies. Kill the others with Magnifying Grass immediately and get rid of its surfboard as fast as possible.
- Kill Surfer Zombies with Magnifying Grass before it gets to the shore.
- Kill Fisherman Zombies as fast possible. They can hook the Rotobagas an infinite amount of times.
- Kill Octo Zombies with Ghost Pepper. Free the Rotobagas from its octopi with Magnifying Grass as soon as possible. Otherwise, Octo Zombie will trap Magnifying Grass with an octopus.
- Kill the first Deep Sea Gargantuar with Magnifying Grass.
- When the final wave comes, use Cherry Bomb to kill as many Fisherman Zombies and Buckethead Zombies. Shoot the Deep Sea Gargantuar with Magnifying Grass as fast as possible before dealing with other threats other than Fisherman Zombies.
- Shoot the rest of the zombies with Magnifying Grass or kill them with Ghost Pepper.
Strategy 7
- Created by Hobo planter
- This strategy does not require any premium content.
- Required plants:
- Execution
- Plant three Primal Sunflowers in the second column.
- Wait for the Guacodile to defeat the first few zombies.
- Plant one Rotobaga in the third column center row after acquiring a Lily Pad.
- Complete the Sunflower row with a column filled with Rotobagas.
- During the low tide, demolish the zombies with Cherry Bombs and Potato Mines.
- Plant an Infi-nut on the fifth column, give it a Plant Food.
- Fill all empty tiles behind the shield with Rotobagas.
- When the Gargantuar appears, use mower launch to demolish him.
- Good luck, fellow planters.
Strategy 8
- Created by 9spaceking
- Requires no premium content.
- Required plants:
- Execution:
- Plant Moonflowers on the third column (second, third, and fourth row) with Lily Pads and stall the first zombies with Iceberg Lettuce/Stallia.
- Plant Dusk Lobbers on the first column. If zombies threaten to overwhelm, use Grimrose to kill especially tough ones.
- When Fisherman Zombies are about to appear, use Infi-nut on a Lily Pad (one column ahead of any plant to prevent Surfboard Zombie) fed with Plant Food.
- Plant Dusk Lobber on the first and last rows of the second column when you have enough sun.
- Throughout the battle use Cherry Bomb and Plant Food carefully and tactfully. Grimrose can damage Surfboard Zombies.
- Good luck!
Gallery
")
")
")
")
")
")
")
")
")
")
")
")
")
")
")
Walkthrough

Big Wave Beach Day 30. Zombies 2 - Big Wave Beach Day 30
- *: Removed ~: Epic Quest